Setting up ProjectSend on your Raspberry Pi 3 for sharing files – the LEMP way
Do you have large files that you want to share with your friends or clients? Do you keep your Internet connection on 24-7?
Compared to using Google Drive, Dropbox or other on-the-cloud file sharing software, hosting your own file sharing software when you never switch off your Internet has a few advantages.
Provided that your friends don't share your files with others, your files stay at home and on your friends' machines. Furthermore, you are only limited by the amount of storage that you have on your machine.
If you have a Raspberry Pi 3 in your house, you may want to consider setting up ProjectSend on your Raspberry Pi 3 for sharing files with others. This post shows how to do it with a LEMP stack.
Hardware recommendations for hosting ProjectSend
I recommend the following hardware for hosting ProjectSend:
- Official Raspberry Pi 3 Case - Red/White
- Raspberry PI 3 Model B A1.2GHz 64-bit quad-core ARMv8 CPU, 1GB RAM
- SanDisk Ultra 128GB microSDXC UHS-I Card with Adapter, Black, Standard Packaging (SDSQUNC-128G-GN6MA)
- CanaKit 5V 2.5A Raspberry Pi 3 Power Supply / Adapter / Charger (UL Listed)
- AmazonBasics RJ45 Cat-6 Ethernet Patch Cable - 3 Feet (0.9 Meters)
If you had a spare micro USB charger that came along with your typical Android phone, you can use it to power your Raspberry Pi 3 instead of buying the CanaKit 5V 2.5A Raspberry Pi 3 Power Supply / Adapter / Charger (UL Listed).
Prerequisite hardware to install operating system onto microSD
Raspberry Pi 3 board will load an operating system from a microSD card. Hence, we will need to have a computer with a SD card reader. If your computer does not come with a SD card reader, you have to get one.
Getting a copy of Raspbian Lite
Once we had gotten the hardware, we can then proceed to download a copy of Raspbian Jessie Lite. The latest Raspbian operating system is available at https://www.raspberrypi.org/downloads/raspbian/. As of this writing, the one that was available was "RASPBIAN JESSIE LITE":
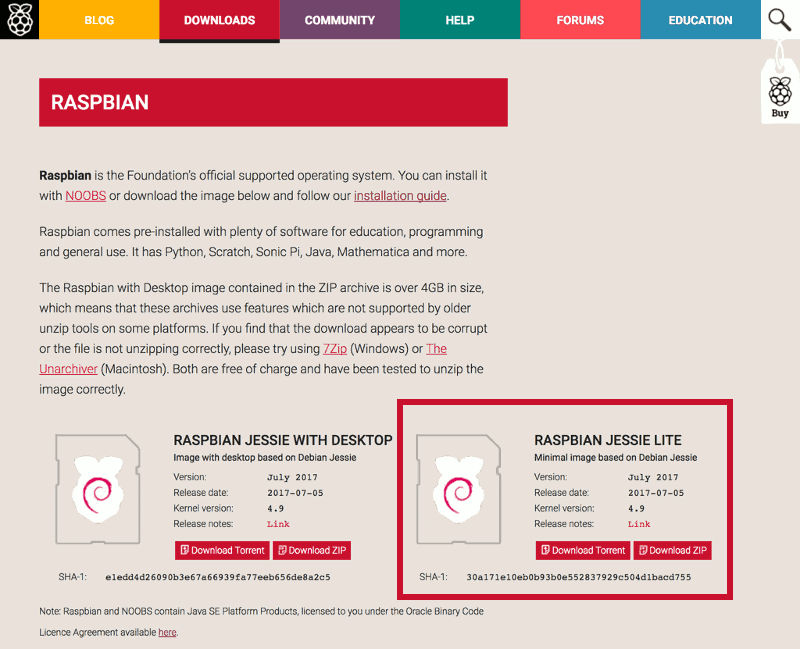
Click on the Download ZIP button and save the file onto your file system.
Installing Raspbian Lite on the microSD card
Once you had gotten the .zip file in your computer, extract the .img file from the .zip file. The .img file is the operating system image that we will use for installing Raspbian Jessie Lite onto the microSD card.
If you have a MacBook, you can use Etcher to install the operating system image onto your microSD card.
If you are using a windows machine, you can use Win32DiskImager to install the operating system for your Raspberry Pi 3.
If you are using a Linux desktop, you should be able to Etcher to install the operating system for your Raspberry Pi 3.
Enabling SSH server for accessing your Raspberry Pi 3 without connecting a keyboard and monitor to it
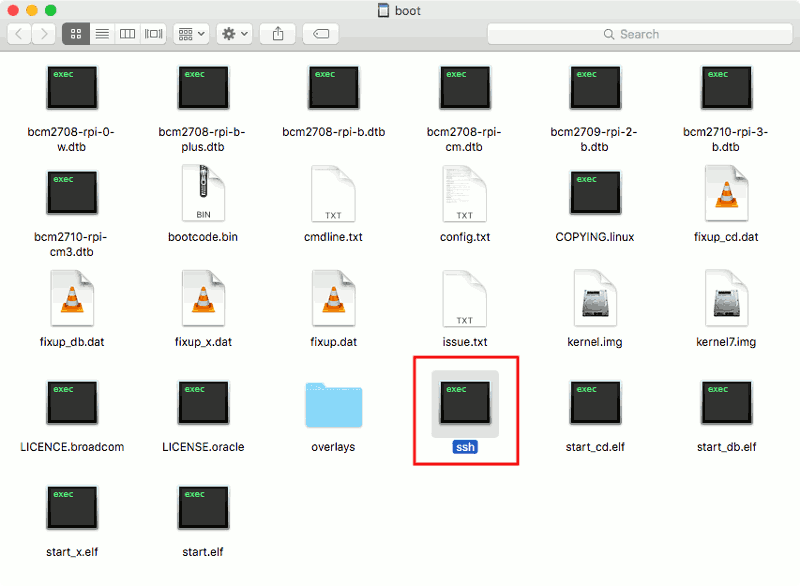
With an SSH server running on Raspbian Jessie Lite, we do not have to find a spare keyboard and monitor in order to configure Raspbian Jessie Lite after it had booted up for the first time. To ensure that we have the SSH server running after the first boot, we can create a file named "ssh” in the boot partition of the SD card:
Assembling the hardware to host ProjectSend
Once you have installed Raspbian Jessie Lite onto your microSD card, remove your microSD card from your SD card reader and insert it to the SD card slot on the Raspberry Pi 3 board. After that, proceed to assemble the Raspberry Pi 3 board to the Official Raspberry Pi case.
Booting up your Raspbian Lite operating system
With the assembly of your Raspberry Pi 3 board and Official Raspberry Pi case, you need to connect one end of the RJ45 cable to the RJ45 port on your Raspberry Pi 3 board and the other end of the cable to one of the switch port of your home router. After that, plugin your micro USB cable and supply power to your Raspberry Pi 3 board.
Finding the IP address of your Raspberry Pi 3
When Raspbian Jessie Lite boots up, it will request an IP address from your router. We will need this IP address in order to SSH into the Raspberry Pi 3. Go to your router's address allocation table and find an entry with the name raspberrypi. Note that IP address for SSH access.
SSH into your Rasbian Jessie Lite with the default credentials
With the IP address, we can then SSH into our Raspberry Pi 3. Assuming that the router had given our Raspberry Pi 3 the IP address 192.168.0.118, we will then open up a terminal program and enter the following command:
ssh pi@192.168.0.118
The default password for the default user pi is raspberry. Enter raspberry when the ssh command prompts for a password and we will be able to get into our Raspbian Jessie Lite to perform other configurations.
After logging into your Raspbian Jessie Lite successfully, you will be able to see the following output:
The programs included with the Debian GNU/Linux system are free software;
the exact distribution terms for each program are described in the
individual files in /usr/share/doc/*/copyright.

Debian GNU/Linux comes with ABSOLUTELY NO WARRANTY, to the extent
permitted by applicable law.

SSH is enabled and the default password for the 'pi' user has not been changed.
This is a security risk - please login as the 'pi' user and type 'passwd' to set a new password.
Changing the default password for user pi
As hinted by the server output, we should change the default password for the pi user. To do so, we enter the following command into the terminal after we had logged into Raspbian Jessie Lite as the pi user:
passwd
At the prompt, type in raspberry for (current) UNIX password and your favourite password for the next two prompts.
Configuring the locale settings
Once we have changed the password, we should configure the locale settings too.
To do so, we first run the Raspberry Pi Software Configuration Tool:
sudo raspi-config
And use it to generate the "en_US.UTF-8" locale and set it as the default locale for the system environment:
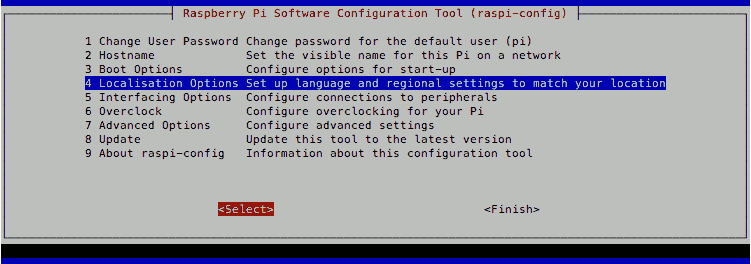
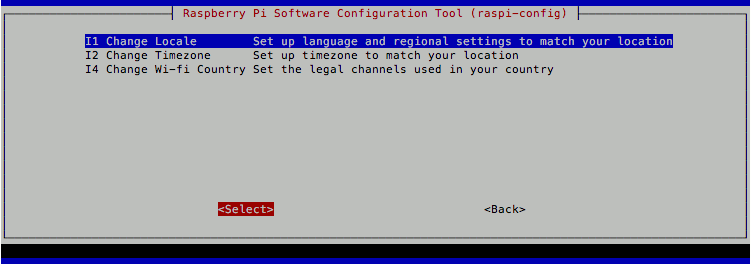
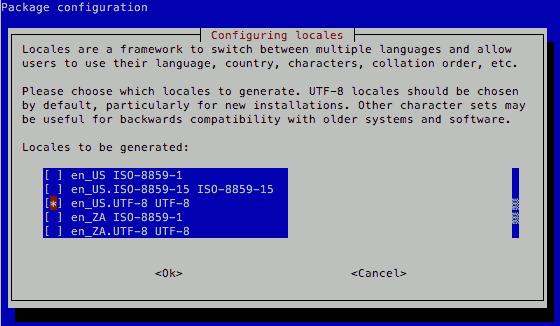
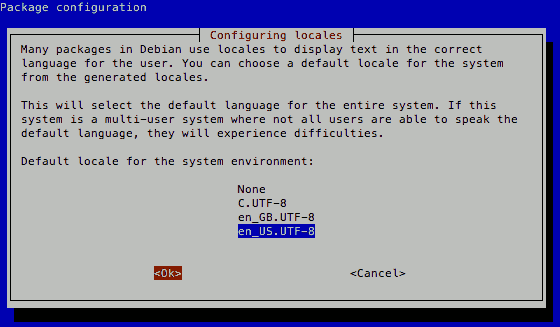
After doing so, open up /etc/default/locale with nano:
sudo nano /etc/default/locale
And updated the contents to look like the following:
LANG=en_US.UTF-8
LC_ALL=en_US.UTF-8
LANGUAGE=en_US.UTF-8
This will ensure that the locale setting persist through system reboots.
Installing the MySQL database server on Raspbian Jessie Lite
ProjectSend requires a MySQL database instance for persisting data. Hence, after setting the locale, we proceed to install MySQL database on Raspbian Jessie Lite.
To do install the MySQL client and MySQL server on Raspbian Jessie Lite, we run the following command:
sudo apt-get install mysql-server mysql-client -y
The command will prompt the following screens for the creation of a password for the root user:
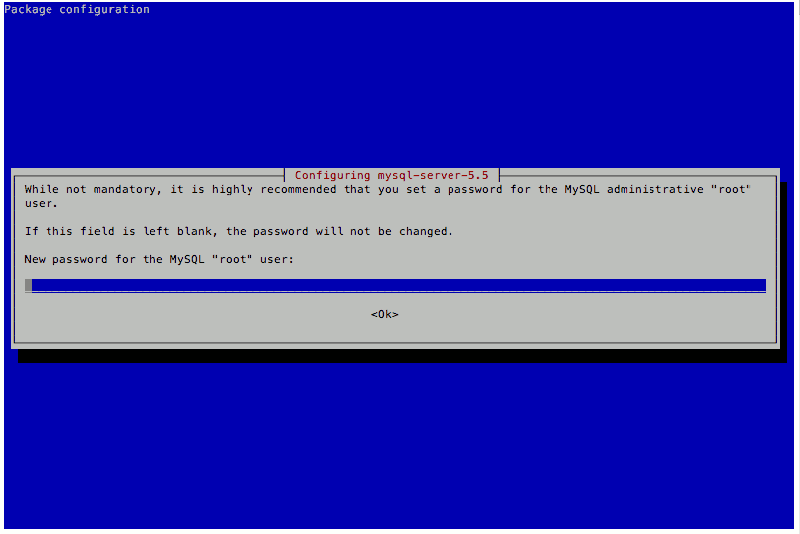
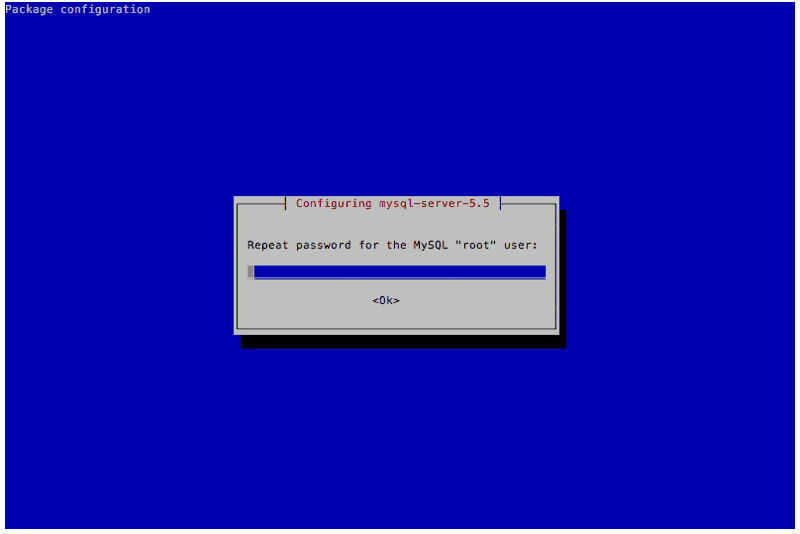
After the command had completed, we can run the following command to verify whether MySQL Server was successfully installed:
sudo systemctl status mysql
If MySQL Server was successfully installed, you will see output similar to the following:
● mysql.service - LSB: Start and stop the mysql database server daemon
   Loaded: loaded (/etc/init.d/mysql)
   Active: active (running) since Fri 2017-08-11 11:12:40 UTC; 7min ago
   CGroup: /system.slice/mysql.service
           ├─6110 /bin/sh /usr/bin/mysqld_safe
           └─6454 /usr/sbin/mysqld --basedir=/usr --datadir=/var/lib/mysql --plugin-dir=/usr/lib/mysql/plugin -...

Aug 11 11:12:57 raspberrypi /etc/mysql/debian-start[6525]: mysql.general_log                                  OK
Aug 11 11:12:57 raspberrypi /etc/mysql/debian-start[6525]: mysql.help_category                                OK
Aug 11 11:12:57 raspberrypi /etc/mysql/debian-start[6525]: mysql.help_keyword                                 OK
Aug 11 11:12:57 raspberrypi /etc/mysql/debian-start[6525]: mysql.help_relation                                OK
Aug 11 11:12:57 raspberrypi /etc/mysql/debian-start[6525]: mysql.help_topic                                   OK
Aug 11 11:12:57 raspberrypi /etc/mysql/debian-start[6525]: mysql.host                                         OK
Aug 11 11:12:57 raspberrypi /etc/mysql/debian-start[6525]: mysql.ndb_binlog_index                             OK
Aug 11 11:12:57 raspberrypi /etc/mysql/debian-start[6525]: mysql.plugin                                       OK
Aug 11 11:12:57 raspberrypi /etc/mysql/debian-start[6525]: mysql.proc                                         OK
Aug 11 11:12:57 raspberrypi /etc/mysql/debian-start[6525]: mysql.procs_priv                                   OK
Installing PHP on Raspbian Jessie Lite
Since ProjectSend is written in PHP, we will install the necessary PHP components next. To install PHP on Raspbian Jessie Lite, we will run the following command:
sudo apt-get install php5 php5-fpm php5-mysql -y
After the command had completed, we can run the following to verify whether the PHP FastCGI Process Manager is up and running:
sudo systemctl status php5-fpm
You should see output similar to the following if PHP FastCGI Process Manager is running fine:
● php5-fpm.service - The PHP FastCGI Process Manager
   Loaded: loaded (/lib/systemd/system/php5-fpm.service; enabled)
   Active: active (running) since Fri 2017-08-11 15:10:02 UTC; 4min 7s ago
 Main PID: 10998 (php5-fpm)
   Status: "Processes active: 0, idle: 2, Requests: 0, slow: 0, Traffic: 0req/sec"
   CGroup: /system.slice/php5-fpm.service
           ├─10998 php-fpm: master process (/etc/php5/fpm/php-fpm.conf)
           ├─11000 php-fpm: pool www
           └─11001 php-fpm: pool www

Aug 11 15:10:02 raspberrypi systemd[1]: Started The PHP FastCGI Process Manager.
Aug 11 15:10:04 raspberrypi systemd[1]: Started The PHP FastCGI Process Manager.
Configuring PHP FPM to listen on a port rather than unix socket
If you have a reverse proxy server sitting on a different device, you will need to configure your PHP FastCGI Process Manager to listen on a port so that the reverse proxy server is able to talk to your PHP FPM.
To configure PHP FPM to listen on a port rather than through unix socket, open up /etc/php5/fpm/pool.d/www.conf and look for the 'listen' variable and set it to a port number (for example 9000):
listen = 9000
Once you had saved your changes, restart PHP FPM by running the following command:
sudo systemctl restart php5-fpm.service
You can verify whether your PHP FPM is listening on your new port by running the following command:
sudo netstat -lptn
You should see output similar to the following:
Active Internet connections (only servers)
Proto Recv-Q Send-Q Local Address           Foreign Address         State       PID/Program name
tcp        0      0 0.0.0.0:9000            0.0.0.0:*               LISTEN      2068/php-fpm.conf)
Installing nginx server
If you had setup a reverse proxy server with nginx, Raspian Jessie Lite and Raspberry Pi 3 or have an nginx server running somewhere in your home network, you can skip this section.
If you do not have a dedicated reverse proxy server, you may want to install it on the same Raspberry Pi 3.
To install nginx server on Raspbian Jessie Lite, you can run the following command:
sudo apt-get update
sudo apt-get install nginx -y --fix-missing
Run the following command to verify that your nginx server is running successfully:
curl -0 http://localhost
You should see output similar to the following if your nginx server is running successfully:
<!DOCTYPE html>
<html>
<head>
<title>Welcome to nginx on Debian!</title>
<style>
    body {
        width: 35em;
        margin: 0 auto;
        font-family: Tahoma, Verdana, Arial, sans-serif;
    }
</style>
</head>
<body>
<h1>Welcome to nginx on Debian!</h1>
<p>If you see this page, the nginx web server is successfully installed and
working on Debian. Further configuration is required.</p>

<p>For online documentation and support please refer to
<a href="http://nginx.org/">nginx.org</a></p>

<p>
      Please use the <tt>reportbug</tt> tool to report bugs in the
      nginx package with Debian. However, check <a
      href="http://bugs.debian.org/cgi-bin/pkgreport.cgi?ordering=normal;archive=0;src=nginx;repeatmerged=0">existing
      bug reports</a> before reporting a new bug.
</p>

<p><em>Thank you for using debian and nginx.</em></p>


</body>
</html>
Getting a copy of ProjectSend
As of this writing, the latest version of ProjectSend is r754. To download this version of ProjectSend from your Raspbian Jessie Lite, you can run the following command:
cd /var/www
sudo wget https://github.com/ignacionelson/ProjectSend/archive/r756.zip
sudo unzip r756.zip
sudo rm r756.zip
With that you will have the source codes at /var/www/ProjectSend-r756.
Changing the owner of ProjectSend's upload folder
In order for the file upload feature to work correctly, the user that runs PHP FPM had to own ProjectSend's upload folder. The PHP FPM is run by the www-data user by default. Therefore, we need to run the following command to change the ownership of ProjectSend's upload folder to the www-data user:
sudo chown -R www-data:www-data /var/www/ProjectSend-r756/upload
Creating a new MySQL user and a database instance for your ProjectSend website
Your instance of ProjectSend will require a MySQL user along with a database instance for data persistence. To begin with the creation of the user and database instance, we first login to the MySQL server instance with the MySQL client:
mysql -u root -p
After providing your password to the password prompt, you can then create the database instance:
mysql> CREATE DATABASE myProjectSendDb;
Once your database instance had been created successfully, proceed on to create the MySQL user which could interact with it:
mysql> CREATE USER 'anewuser'@'localhost' IDENTIFIED BY 'password';
mysql> GRANT ALL ON myProjectSendDb.* TO 'anewuser'@'localhost';
Creating ProjectSend configuration file for interacting with the database instance
Inside the /var/www/ProjectSend-r756/includes directory, there is a sys.config.sample.php for us to use as a basis for configuring our ProjectSend instance.
To configure our ProjectSend instance, we first make a copy of the sample configuration, naming it as sys.config.php:
sudo cp /var/www/ProjectSend-r756/includes/sys.config.sample.php /var/www/ProjectSend-r756/includes/sys.config.php
Based on the example values that we had defined earlier, we will replace the database definitions inside sys.config.php to look like the following:
/** Database name */
define('DB_NAME', 'myProjectSendDb');

/** Database host (in most cases it's localhost) */
define('DB_HOST', 'localhost');

/** Database username (must be assigned to the database) */
define('DB_USER', 'anewuser');

/** Database password */
define('DB_PASSWORD', 'password');
Preventing incorrect table definition for MySQL Server versions below 5.6
Since as of this writing, the MySQL server that was installed was 5.5.57, there cannot be more than one column in a table with CURRENT_TIMESTAMP in DEFAULT or ON UPDATE clause.
Hence, we need to edit a particular column definition inside /var/www/ProjectSend-r756/install/database.php. Look for expiry_date and change the code to look like the following:
`expiry_date` TIMESTAMP NOT NULL DEFAULT "2017-01-01 00:00:00"
Configuring nginx to serve HTTP requests for your ProjectSend website
To reach our ProjectSend website, we will need to configure our nginx to proxy HTTP requests to our PHP web application served by PHP FPM.
Assuming that we had created a DNS type A record which points sf.anexistingurl.com to our reverse proxy server, the following configuration is what we will need to configure our nginx to proxy HTTP requests to our PHP FPM instance:
server {
    listen   80;
    root /var/www/ProjectSend-r756;
    index index.php index.html;

    server_name sf.anexistingurl.com;

    location / {
        # First attempt to serve request as file, then
        # as directory, then fall back to index.html
        try_files $uri $uri/ /index.html;
    }

    error_page 404 /404.html;

    # redirect server error pages to the static page /50x.html
    error_page 500 502 503 504 /50x.html;
    location = /50x.html {
        root /usr/share/nginx/www;
    }

    # pass the PHP scripts to FastCGI server
    location ~ \.php$ {
                fastcgi_split_path_info ^(.+\.php)(/.+)$;

                fastcgi_index index.php;
                include fastcgi_params;
                fastcgi_param SCRIPT_FILENAME $document_root$fastcgi_script_name;
                fastcgi_pass 192.168.0.118:9000;
    }
}
On my Raspbian Jessie Lite reverse proxy server, I will save this file as /etc/nginx/sites-enabled/sf.anexistingurl.com.conf.
After I do so, I would restart nginx with the following command:
sudo systemctl restart nginx.service
Running the install script of ProjectSend
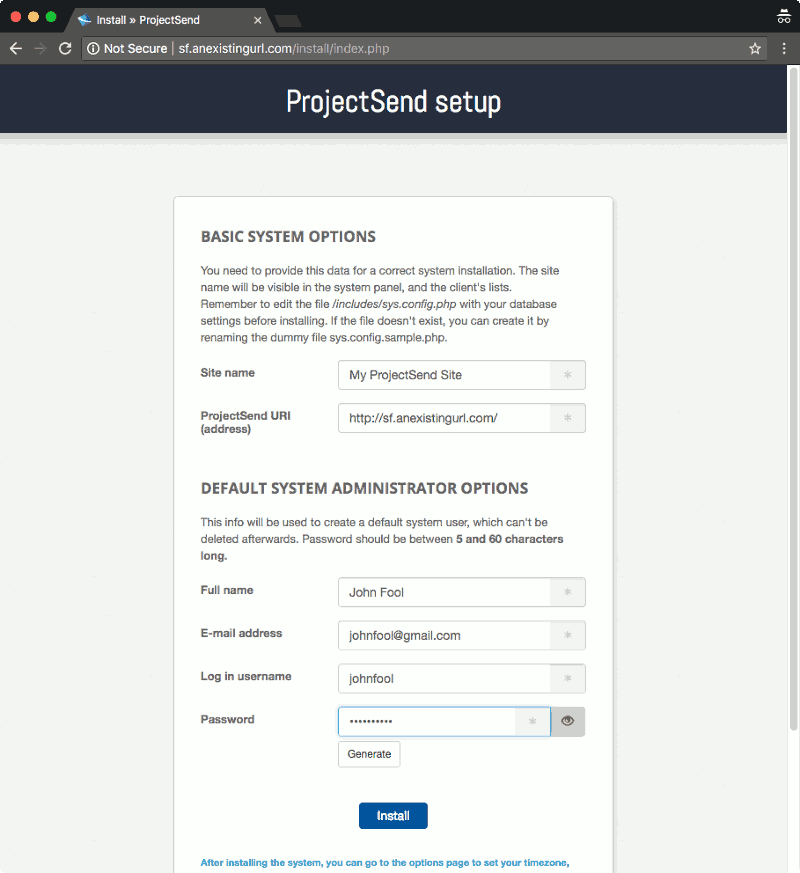
Once you got the nginx configurations in place, you can then access http://sf.anexistingurl.com/install with your browser. Complete the necessary details and click on the Install button:
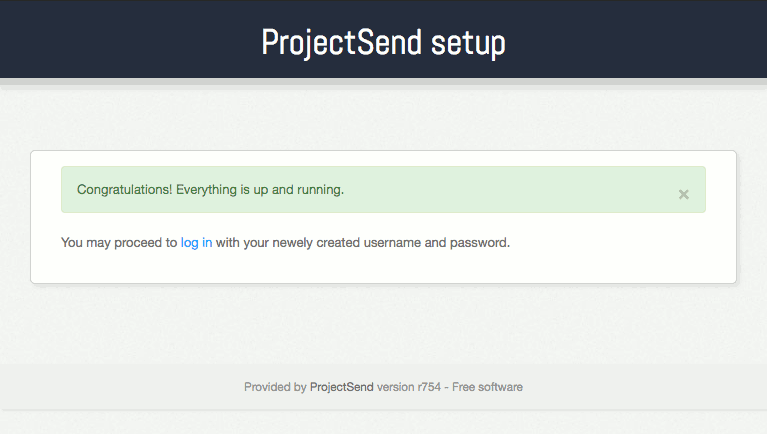
Once you do so, you will see the following screen:
Configuring SSL for your ProjectSend website
With Let's Encrypt, getting an SSL certificate comes with no cost. Since we may be sharing private files with our friends, why not go further to configure SSL for our ProjectSend website?
Installing CertBot on our Raspbian Jessie Lite reverse proxy server
With an ACME client like CertBot, we will be able to automate the retrieval of SSL artefacts from Let's Encrypt. If you do not have CertBot installed on your Raspbian Jessie Lite reverse proxy server, you will need to install it first.
Configuring nginx to demonstrate control over your domain
The Let's Encrypt server will look for some random file written by Certbot at the /.well-known uri path of our domain in order to be convinced that we owned the domain that we wish to secure with HTTPS.
Therefore, we will have to modify our nginx configuration to serve files via the /.well-known uri. To do so, I will open up /etc/nginx/sites-enabled/sf.anexistingurl.com.conf and add the following nginx configuration block inside the server block:
location ~ /.well-known {
    allow all;
}
The resultant nginx configuration file will look like this:
server {
    listen   80;
    root /var/www/ProjectSend-r756;
    index index.php index.html;

    server_name sf.anexistingurl.com;

    location / {
        # First attempt to serve request as file, then
        # as directory, then fall back to index.html
        try_files $uri $uri/ /index.html;
    }

    error_page 404 /404.html;

    # redirect server error pages to the static page /50x.html
    error_page 500 502 503 504 /50x.html;
    location = /50x.html {
        root /usr/share/nginx/www;
    }

    # pass the PHP scripts to FastCGI server
    location ~ \.php$ {
        fastcgi_split_path_info ^(.+\.php)(/.+)$;

        fastcgi_index index.php;
        include fastcgi_params;
        fastcgi_param SCRIPT_FILENAME $document_root$fastcgi_script_name;
        fastcgi_pass 192.168.0.118:9000;
    }

    location ~ /.well-known {
        allow all;
    }
}
Once I had saved the changes made to the nginx configuration file, I restart nginx by running the following command:
sudo systemctl restart nginx.service
Using Certbot to get Let's Encrypt to issue the SSL certificate for our domain
After the nginx configurations is being applied, we are ready to use Certbot to get Let's Encrypt to issue the SSL certificate for our domain. To do so, enter the following command:
sudo certbot certonly --webroot -w /var/www/ProjectSend-r756 -d sf.anexistingurl.com
When the command runs for the very first time on your machine, it will ask for an email address to notify when the SSL certificate is going to expire and an agreement to Let's Encrypt Terms of Service.
Once we have given the necessary responses, CertBot will create the SSL artefacts inside the /etc/letsencrypt/live/sf.anexistingurl.com folder. Inside /etc/letsencrypt/live/sf.anexistingurl.com, we will also find cert.pem, chain.pem, fullchain.pem and privkey.pem. The files inside /etc/letsencrypt/live/sf.anexistingurl.com folder are symbolic links for facilitating certificate renewal without changing our server side configurations.
Generating a strong Diffie-Hellman group
After the SSL certificate and the corresponding private key were created successfully, we should also precompute a strong Diffie-Hellman group for our reverse proxy server to use for exchanging cryptographic keys with its clients:
sudo openssl dhparam -out /etc/ssl/certs/dhparam.pem 2048
This process will take a very long time to complete but it will be worth the effort as it would make communicating with our server more secure.
Creating the nginx configurations for serving HTTPS for your ProjectSend website
Apart from enabling HTTPS communication on port 443 of our Raspbian Jessie Lite reverse proxy server, we also want any HTTP request made to port 80 to be redirected to port 443 via the HTTPS protocol. To serve such a use case, we will open up /etc/nginx/sites-enabled/sf.anexistingurl.com.conf and replace the content with the following:
# Redirect HTTP requests to HTTPS
server {
    listen 80;
    server_name  sf.anexistingurl.com;
    return 301 https://$host$request_uri;
}

# For ssl
server {
    ssl on;
    ssl_certificate /etc/letsencrypt/live/sf.anexistingurl.com/fullchain.pem;
    ssl_certificate_key /etc/letsencrypt/live/sf.anexistingurl.com/privkey.pem;
    ssl_protocols TLSv1 TLSv1.1 TLSv1.2;
    ssl_prefer_server_ciphers on;
    ssl_dhparam /etc/ssl/certs/dhparam.pem;
    ssl_ciphers 'ECDHE-RSA-AES128-GCM-SHA256:ECDHE-ECDSA-AES128-GCM-SHA256:ECDHE-RSA-AES256-GCM-SHA384:ECDHE-ECDSA-AES256-GCM-SHA384:DHE-RSA-AES128-GCM-SHA256:DHE-DSS-AES128-GCM-SHA256:kEDH+AESGCM:ECDHE-RSA-AES128-SHA256:ECDHE-ECDSA-AES128-SHA256:ECDHE-RSA-AES128-SHA:ECDHE-ECDSA-AES128-SHA:ECDHE-RSA-AES256-SHA384:ECDHE-ECDSA-AES256-SHA384:ECDHE-RSA-AES256-SHA:ECDHE-ECDSA-AES256-SHA:DHE-RSA-AES128-SHA256:DHE-RSA-AES128-SHA:DHE-DSS-AES128-SHA256:DHE-RSA-AES256-SHA256:DHE-DSS-AES256-SHA:DHE-RSA-AES256-SHA:AES128-GCM-SHA256:AES256-GCM-SHA384:AES128-SHA256:AES256-SHA256:AES128-SHA:AES256-SHA:AES:CAMELLIA:DES-CBC3-SHA:!aNULL:!eNULL:!EXPORT:!DES:!RC4:!MD5:!PSK:!aECDH:!EDH-DSS-DES-CBC3-SHA:!EDH-RSA-DES-CBC3-SHA:!KRB5-DES-CBC3-SHA';
    ssl_session_timeout 1d;
    ssl_session_cache shared:SSL:50m;
    ssl_stapling on;
    ssl_stapling_verify on;
    add_header Strict-Transport-Security max-age=15768000;

    default_type  application/octet-stream;

    listen 443;
    server_name  sf.anexistingurl.com;

    root /var/www/ProjectSend-r756;
    index index.php index.html;

    location / {
        # First attempt to serve request as file, then
        # as directory, then fall back to index.html
        try_files $uri $uri/ /index.html;
    }

    error_page 404 /404.html;

    # redirect server error pages to the static page /50x.html
    error_page 500 502 503 504 /50x.html;
    location = /50x.html {
        root /usr/share/nginx/www;
    }

    # pass the PHP scripts to FastCGI server
    location ~ \.php$ {
        fastcgi_split_path_info ^(.+\.php)(/.+)$;

        fastcgi_index index.php;
        include fastcgi_params;
        fastcgi_param SCRIPT_FILENAME $document_root$fastcgi_script_name;
        fastcgi_pass 192.168.0.118:9000;
    }

    location ~ /.well-known {
        allow all;
    }
}
And after we had saved the changes, we restart nginx with the following command:
sudo systemctl restart nginx.service
Updating base uri to reflect https
Since ProjectSend saved the base uri with the protocol scheme, we need to change it in order for ProjectSend to work properly via HTTPS. To do so, we first log into our MySQL server through the MySQL client:
sudo mysql -u root -p
After entering the password, we run the following SQL statement to update the base uri with https:// as the protocol scheme:
mysql> UPDATE tbl_options SET value = 'https://sf.anexistingurl.com/' WHERE name = 'base_uri';
Buying the recommended hardware list to setup your own ProjectSend website with Raspbian Jessie Lite
If you do not have the Raspberry Pi 3 hardware mentioned in this post yet, you may want to purchase them from Amazon. Simply click on the button below to add the Raspberry Pi 3 hardware to your cart. You may remove anything that you already have or replace some of the hardware with other hardware.