How to setup Codiad Web IDE on your Raspberry Pi 3 with Raspbian Stretch Lite, Nginx and PHP
A Web IDE server allows you to code wherever you are and whenever you want from any device through a web browser. A Raspberry Pi 3 board is a good gift for programmers and if you happen to receive one or bought one and do not know what to do with it, you may want to setup Codiad Web IDE on it to help you code while you are on the move.
Read on to find out how to setup Codiad Web IDE on your Raspberry Pi 3 with Raspbian Stretch Lite, Nginx and PHP as the LEMP stack.
Recommended hardware list to build your Raspberry Pi 3 Codiad Web IDE
If you do not have the hardware to build your Raspberry Pi 3 Codiad Web IDE, you may want to consider getting the following hardware:
- Raspberry Pi 3 board
- Sandisk Ultra 64GB Micro SDXC UHS-I Card with Adapter - 100MB/s U1 A1
- Official case for Raspberry Pi 3 Model B (Black and Grey)
- CanaKit 5V 2.5A Raspberry Pi 3 Power Supply / Adapter / Charger
- AmazonBasics RJ45 Cat-6 Ethernet Patch Cable - 3 Feet (0.9 Meters)
Setting up Raspbian Stretch Lite with SSH server enabled on your microSD card
Once you had gathered all the necessary hardware, proceed to setup Raspbian Stretch Lite with SSH server enabled on your microSD card. Doing so will allow you to SSH into your Raspbian Stretch Lite to perform further configurations in this post.
Assembling the hardware for the Raspberry Pi 3
Once you had prepared the microSD card with Raspbian Stretch Lite as the operating system, remove the microSD card from your SD card reader and insert it to the microSD card slot on the Raspberry Pi 3 board. After that, proceed to assemble the Raspberry Pi 3 board to the Official Raspberry Pi case.
Starting the Raspbian Stretch Lite operating system
After you had assembled the Raspberry Pi 3 board with the Official Raspberry Pi case, connect one end of the RJ45 cable to the RJ45 port on the Raspberry Pi 3 board and the other end of the cable to one of the switch port of your home router. After that, connect the micro USB power supply to the Raspberry Pi 3 board and a wall socket. Turn on the power socket to supply power to the Raspberry Pi 3 board.
Changing default password, Locale and Timezone of your Raspbian Stretch Lite
There are a few configurations that you should perform on the first run of your Raspbian Stretch Lite. Proceed on to change the default password, Locale and Timezone of your Raspbian Stretch Lite.
Installing Nginx on Raspbian Stretch Lite
Nginx runs well on Raspberry Pi 3 and can serve as a reverse proxy server for other upstream applications written in other programming languages. By putting Nginx in front of Codiad, we are giving our Raspberry Pi 3 room for deploying other applications in the future.
To install Nginx on Raspbian Stretch Lite, run the following commands:
sudo apt-get update
sudo apt-get install nginx -y
After the installation completes, you can run the following command to verify that Nginx is installed successfully:
sudo systemctl status nginx.service
Nginx is installed successfully if you see output similar to the following:
● nginx.service - A high performance web server and a reverse proxy server
   Loaded: loaded (/lib/systemd/system/nginx.service; enabled; vendor preset: enabled)
   Active: active (running) since Wed 2018-03-07 23:17:15 +08; 4min 0s ago
     Docs: man:nginx(8)
  Process: 15094 ExecStart=/usr/sbin/nginx -g daemon on; master_process on; (code=exited, status=0/SUCCESS)
  Process: 15091 ExecStartPre=/usr/sbin/nginx -t -q -g daemon on; master_process on; (code=exited, status=0/SU
 Main PID: 15095 (nginx)
   CGroup: /system.slice/nginx.service
           ├─15095 nginx: master process /usr/sbin/nginx -g daemon on; master_process on;
           ├─15096 nginx: worker process
           ├─15097 nginx: worker process
           ├─15098 nginx: worker process
           └─15099 nginx: worker process

Mar 07 23:17:15 raspberrypi systemd[1]: Starting A high performance web server and a reverse proxy server...
Mar 07 23:17:15 raspberrypi systemd[1]: Started A high performance web server and a reverse proxy server.
Installing PHP 7 on Raspbian Stretch Lite
Since Codiad Web IDE is written in PHP, the next item on the list is to install the PHP 7 binary and the FastCGI Process Manager. Run the following command to do so:
sudo apt-get install php7.0 php7.0-fpm -y
Once the command completes, you can check if PHP 7 FastCGI Process Manager is installed successfully with the following command:
sudo systemctl status php7.0-fpm.service
You should see output similar to the following if PHP 7 FastCGI Process Manager is installed successfully:
● php7.0-fpm.service - The PHP 7.0 FastCGI Process Manager
   Loaded: loaded (/lib/systemd/system/php7.0-fpm.service; enabled; vendor preset: enabled)
   Active: active (running) since Wed 2018-03-07 23:24:31 +08; 21min ago
     Docs: man:php-fpm7.0(8)
 Main PID: 21314 (php-fpm7.0)
   Status: "Processes active: 0, idle: 2, Requests: 0, slow: 0, Traffic: 0req/sec"
   CGroup: /system.slice/php7.0-fpm.service
           ├─21314 php-fpm: master process (/etc/php/7.0/fpm/php-fpm.conf)
           ├─21315 php-fpm: pool www
           └─21316 php-fpm: pool www

Mar 07 23:24:31 raspberrypi systemd[1]: Starting The PHP 7.0 FastCGI Process Manager...
Mar 07 23:24:31 raspberrypi systemd[1]: Started The PHP 7.0 FastCGI Process Manager.
Installing the PHP modules that is needed by Codiad Web IDE
The Codiad Web IDE marketplace requires the mbstring, zip and openssl PHP libraries in order to function properly. Since mbstring and zip are not packaged with the PHP binary that we had installed earlier, we need to install them by running the following command:
sudo apt-get install php-zip php-mbstring -y
Downloading a copy of the Codiad Web IDE
At this writing, the latest stable release for Codiad Web IDE is v.2.8.4. Run the following commands to download the source code for Codiad v.2.8.4:
cd /var/www
sudo wget https://github.com/Codiad/Codiad/archive/v.2.8.4.tar.gz
sudo tar -xvzf v.2.8.4.tar.gz
sudo rm v.2.8.4.tar.gz
You will get a copy of the Codiad Web IDE source code at /var/www/Codiad-v.2.8.4 after the commands had completed.
Changing the owner of the /var/www/Codiad-v.2.8.4 directory to www-data
Once you had downloaded a copy of Codiad Web IDE, the next step is to change the owner of the source code directory to www-data. Run the following command to do so:
sudo chown -R www-data:www-data /var/www/Codiad-v.2.8.4
Configure Nginx to serve Codiad Web IDE via the private IP address
After you had changed the owner of the source code directory, the next step is to configure Nginx to serve the PHP web application, Codiad Web IDE, via the private IP address of your Raspberry Pi. This is to facilitate you in running the install script and creating the first user for your Codiad Web IDE.
Suppose that you Raspberry Pi had gotten 192.168.1.109 as the private address. To configure Nginx to serve the IDE via the private IP address, use nano to create a file at /etc/nginx/sites-enabled/192.168.1.109.conf:
sudo nano
And create the following content inside the file:
server {

    listen 80;
    server_name 192.168.1.109;

    root /var/www/Codiad-v.2.8.4;
    index index.php;

    location / {
        try_files $uri $uri/ /index.php?$args;
    }

    location ~ \.php$ {
        include fastcgi.conf;
        fastcgi_pass unix:/run/php/php7.0-fpm.sock;
        fastcgi_buffers 16 16k;
        fastcgi_buffer_size 32k;
    }

}
After you had saved the changes to the file, restart Nginx by running the following command:
sudo systemctl restart nginx.service
Performing initial setup of your Codiad Web IDE
Once you had done so, put in the private IP address of your Raspberry Pi into the location bar of the browser in your work computer (for example, http://192.168.1.109).
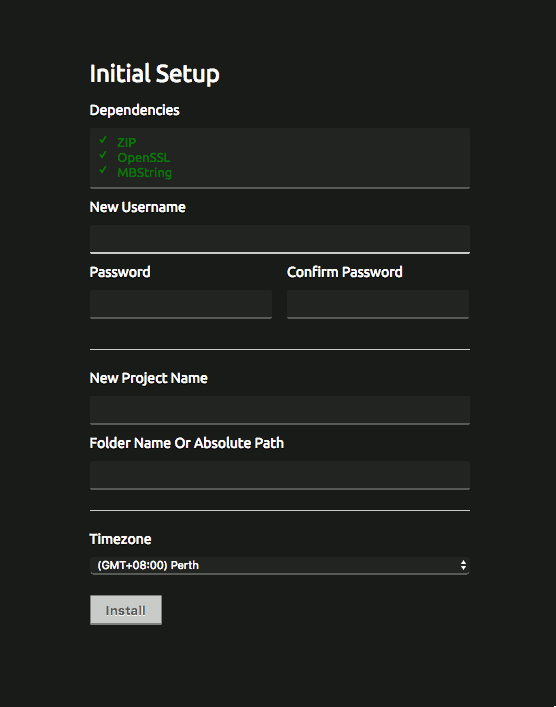
You should see the following screen that prompts you to perform the initial setup for your Codiad Web IDE:

This screen allows us to create our first Codiad IDE user with a first project to work on. The directory that you provide in this screen had to be owned by the www-data user; if not, Codiad Web IDE will not be able to use that directory to work on the source codes within that directory.
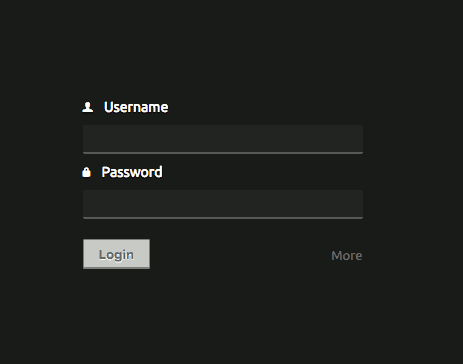
After filling in the fields and clicking the install button, you will be prompted to login with the user credentials that you had supplied in the initial setup screen:

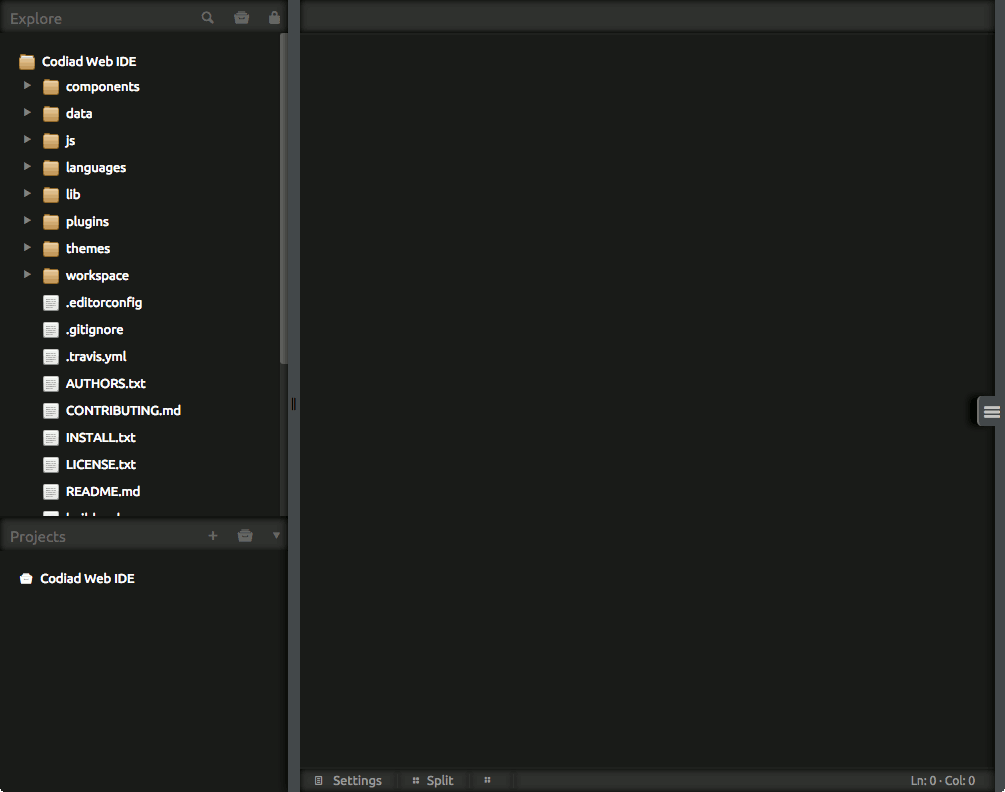
After you had logged in, you should see the editor screen to work on the source codes that is contained within the directory that you had supplied in the initial setup screen:

Enabling outside access to your Codiad Web IDE via your own domain name through HTTP
Once you had performed the initial setup for your Codiad Web IDE, you can continue to enable access to it from your home network. If you do not switch off your home router and Internet modem, chances are the public IP address that your router had retrieved from your ISP will not change.
For the rest of this guide, let's assume that:
- the public IP address of our router will not change.
- you have a domain name at your disposal.
- you had configured the domain name server to map the domain name to the public IP address of your router.
If your public IP address changes frequently or you do not have a domain name, you will need to use the service of a Dynamic DNS service. For example, you can buy a Namecheap domain and get your Raspberry Pi 3 to use Namecheap dynamic DNS to update your domain when your home’s public IP address changes.
Configuring Nginx to serve Codiad Web IDE through HTTP
Let's assume that you are using ide.anexistingdomain.com as the domain name to access your Codiad Web IDE from outside your home.
To configure Nginx to serve Codiad Web IDE through HTTP requests directed at ide.anexistingdomain.com, we first rename /etc/nginx/sites-enabled/192.168.1.109.conf to /etc/nginx/sites-enabled/ide.anexistingdomain.com.conf:
sudo mv /etc/nginx/sites-enabled/192.168.1.109.conf /etc/nginx/sites-enabled/ide.anexistingdomain.com.conf
Once we had renamed the configuration file, we then use nano to open up the /etc/nginx/sites-enabled/ide.anexistingdomain.com.conf file:
sudo nano /etc/nginx/sites-enabled/ide.anexistingdomain.com.conf
And change the server_name from 192.168.1.109 to ide.anexistingdomain.com.
Enabling outside access to your Codiad Web IDE via your own domain name through HTTPS
The Nginx configurations that we had discussed so far will allow you to access your Codiad Web IDE via your own domain name through HTTP. However, communication between Nginx and web clients is not encrypted. Since Let's Encrypt give us free browser-trusted SSL certificates, you may want to consider securing access to your Codiad Web IDE through HTTPS.
Installing Certbot on Raspbian Stretch Lite
The issuance of Let’s Encrypt certificates is automated by software participating in the ACME protocol. Certbot is one such client that can help us get free browser-trusted SSL/TLS certificates from Let's Encrypt. Proceed to install Certbot on your Raspbian Stretch Lite operating system.
Configuring Nginx to demonstrate control over your domain
After you had installed Certbot on your Raspbian Stretch Lite on your Raspbian Stretch Lite operating system, the next step is to configure Nginx to take part in the ACME protocol to demonstrate control over your domain.
One of Let's Encrypt servers will validate that you are running an ACME client on your Raspberry Pi 3 during the generation of the SSL certificate. The Let's Encrypt server will do so by accessing a file that the ACME client had shared with it through the /.well-known uri path.
Hence, you will need to add in the following location block in the Nginx configuration that we had mentioned earlier:
location ~ /.well-known {
    allow all;
}
The addition of this block will result in /etc/nginx/sites-enabled/ide.anexistingdomain.com.conf to contain the following content:
server {

    listen 80;
    server_name ide.anexistingdomain.com;

    root /var/www/Codiad-v.2.8.4;
    index index.php;

    location ~ /.well-known {
        allow all;
    }

    location / {
        try_files $uri $uri/ /index.php?$args;
    }

    location ~ \.php$ {
        include fastcgi.conf;
        fastcgi_pass unix:/run/php/php7.0-fpm.sock;
        fastcgi_buffers 16 16k;
        fastcgi_buffer_size 32k;
    }

}
Once you had made the changes to /etc/nginx/sites-enabled/ide.anexistingdomain.com.conf, restart Nginx with the following command:
sudo systemctl restart nginx.service
Using Certbot to get Let's Encrypt to issue the browser-trusted SSL certificate for our domain
Once you had allowed access to the /.well-known url, run the following command to generate the SSL certificate for your Codiad Web IDE:
sudo certbot certonly -a webroot --webroot-path=/var/www/Codiad-v.2.8.4 -d ide.anexistingdomain.com
When the command runs for the very first time on your machine, it will ask for an email address to notify when the SSL certificate is going to expire and an agreement to Let's Encrypt Terms of Service.
Once you had given the necessary responses, CertBot will create the SSL artefacts inside the /etc/letsencrypt/live/ide.anexistingdomain.com directory. Inside /etc/letsencrypt/live/ide.anexistingdomain.com, you will find cert.pem, chain.pem, fullchain.pem and privkey.pem. The files inside /etc/letsencrypt/live/ide.anexistingdomain.com directory are symbolic links for facilitating certificate renewal without changing your server side configurations.
Generating a strong Diffie-Hellman group
The next ingredient for our Nginx to serve HTTPS traffic is a strong Diffie-Hellman group. Run the following command to precompute a strong Diffie-Hellman group for your Codiad Web IDE to use for exchanging cryptographic keys with its clients:
sudo openssl dhparam -out /etc/ssl/certs/dhparam.pem 2048
Configuring Nginx to serve Codiad Web IDE over HTTPS
Next up, proceed to configure Nginx to serve Codiad Web IDE over HTTPS. To do so, change the contents of /etc/nginx/sites-enabled/ide.anexistingdomain.com.conf to the following:
server {
        listen   80;
        server_name ide.anexistingdomain.com;
        return 301 https://$host$request_uri;
}

# For ssl
server {
        ssl on;

        ssl_certificate /etc/letsencrypt/live/ide.anexistingdomain.com/fullchain.pem;
        ssl_certificate_key /etc/letsencrypt/live/ide.anexistingdomain.com/privkey.pem;
        ssl_protocols TLSv1 TLSv1.1 TLSv1.2;
        ssl_prefer_server_ciphers on;
        ssl_dhparam /etc/ssl/certs/dhparam.pem;
        ssl_ciphers 'ECDHE-RSA-AES128-GCM-SHA256:ECDHE-ECDSA-AES128-GCM-SHA256:ECDHE-RSA-AES256-GCM-SHA384:ECDHE-ECDSA-AES256-GCM-SHA384:DHE-RSA-AES128-GCM-SHA256:DHE-DSS-AES128-GCM-SHA256:kEDH+AESGCM:ECDHE-RSA-AES128-SHA256:ECDHE-ECDSA-AES128-SHA256:ECDHE-RSA-AES128-SHA:ECDHE-ECDSA-AES128-SHA:ECDHE-RSA-AES256-SHA384:ECDHE-ECDSA-AES256-SHA384:ECDHE-RSA-AES256-SHA:ECDHE-ECDSA-AES256-SHA:DHE-RSA-AES128-SHA256:DHE-RSA-AES128-SHA:DHE-DSS-AES128-SHA256:DHE-RSA-AES256-SHA256:DHE-DSS-AES256-SHA:DHE-RSA-AES256-SHA:AES128-GCM-SHA256:AES256-GCM-SHA384:AES128-SHA256:AES256-SHA256:AES128-SHA:AES256-SHA:AES:CAMELLIA:DES-CBC3-SHA:!aNULL:!eNULL:!EXPORT:!DES:!RC4:!MD5:!PSK:!aECDH:!EDH-DSS-DES-CBC3-SHA:!EDH-RSA-DES-CBC3-SHA:!KRB5-DES-CBC3-SHA';
        ssl_session_timeout 1d;
        ssl_session_cache shared:SSL:50m;
        ssl_stapling on;
        ssl_stapling_verify on;
        add_header Strict-Transport-Security max-age=15768000;
        default_type application/octet-stream;
        listen 443;

        root /var/www/Codiad-v.2.8.4;
        index index.php;

        server_name ide.anexistingdomain.com ;

        location ~ /.well-known {
             allow all;
        }

        location / {
             try_files $uri $uri/ /index.php?$args;
        }

        location ~ \.php$ {
            include fastcgi.conf;
            fastcgi_pass unix:/run/php/php7.0-fpm.sock;
            fastcgi_buffers 16 16k;
            fastcgi_buffer_size 32k;
        }
}
Configuring Codiad Web IDE
Before using Codiad Web IDE for your development projects, you need to change some configurations inside the /var/www/Codiad-v.2.8.4/config.php file.
Updating the value of BASE_URL
Since you had run the initial steps when you configured Nginx to serve Codiad Web IDE through the private IP address, you need to update the BASE_URL variable to take the value of your domain name. To do so, find the code:
define("BASE_URL", "192.168.1.109");
and change it to:
define("BASE_URL", "ide.anexistingdomain.com");
Specifying the directories where Codiad Web IDE can take as absolute paths for the projects that you want to work on
By default, Codiad IDE only allows absolute path to projects contained in its own source code root directory and /home. If you want to work on projects that are contained in other directories, for example /var/www, find the code:
define("WHITEPATHS", BASE_PATH . ",/home");
and change it to:
define("WHITEPATHS", BASE_PATH . ",/home,/var/www/");
Buying the recommended hardware to setup your own Codiad Web IDE
If you do not have the Raspberry Pi 3 hardware mentioned in this post yet, you may want to purchase them from Amazon. Simply click on the button below to add the Raspberry Pi 3 hardware to your cart. You may remove anything that you already have or replace some of the hardware with other hardware.
