How to get your Raspberry Pi 3 to use Namecheap dynamic DNS to update your domain when your home’s public IP address changes
When you do not leave your modem and router on 24-7, chances are that your public IP address will change. As I had noted in how to host multiple website at home, a public IP address is needed for HTTP clients to reach your HTTP servers at home.
On the other hand, a domain name allows us to map some meaningful English characters to that public IP address. Therefore, it is easier to access our servers with a domain name rather than an IP address.
Although you can get a free subdomain from a dynamic DNS provider, getting your own domain name from a domain registrar like Namecheap can be better. On one hand, you get your own online branding for establishing yourself or your business on the Internet. On the other hand, you are resilient to having your domain shutdown by the dynamic DNS provider for any reasons that is beyond your control.
Previously, I shared why Namecheap is the best domain name registrar for hosting your web server at home. One of the reasons is that Namecheap provides dynamic DNS for us to update the host records of our domain whenever our public IP address changes. Since Raspberry Pi 3 is an affordable, small and energy efficient single board computer, you can get it to use Namecheap Dynamic DNS service to update your domain when your home's public IP address changes.
In case you need it, this is how to get Raspberry Pi 3 to use Namecheap dynamic DNS to update your domain when your home's public IP address changes.
Getting a cheap domain name from Namecheap
In case you are looking to buy a domain, you can head over to Namecheap's promotions page to check out their current promotions. In addition, you can checkout their coupons page to get your domain with some discount.
Adding the necessary host records for your domain
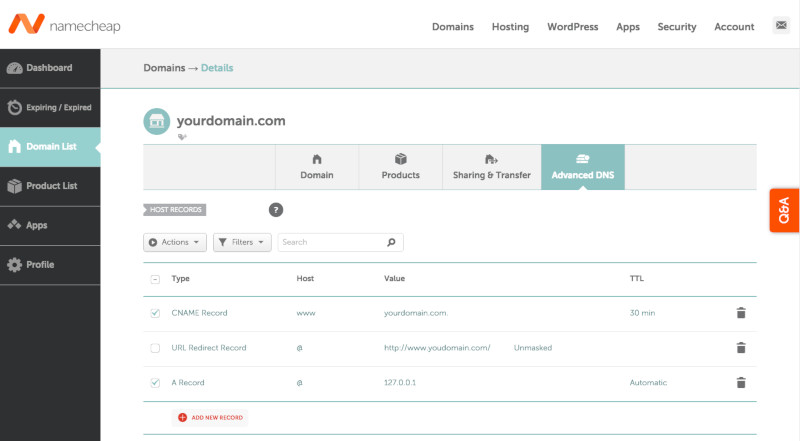
After you had gotten your domain name from Namecheap, you will need to setup some host records for your domain.
The host records page for your domain should look like the following:

Note that if you miss this step, you will find the following error message in /var/log/syslog when you run DDClient later:
/var/log/syslog:Oct 13 12:35:08 raspberrypi ddclient[5591]: WARNING: <?xml version="1.0"?><interface-response><Command>SETDNSHOST</Command><Language>eng</Language><ErrCount>1</ErrCount><errors><Err1>No Records updated. A record not Found;</Err1></errors><ResponseCount>1</ResponseCount><responses><response><ResponseNumber>380091</ResponseNumber><ResponseString>No updates; A record not Found;</ResponseString></response></responses><Done>true</Done><debug><![CDATA[]]></debug></interface-response>
Seeing the above error message will mean that your Raspberry Pi 3 was not able to update the public IP address record for your domain.
Enabling Dynamic DNS for your domain in Namecheap dashboard
After you had gotten your domain name from Namecheap, you will need to enable Dynamic DNS for your Namecheap domain. Once you had gone through the steps in the article, note down the Dynamic DNS password for updating your public IP address changes with Namecheap.
Recommended hardware list for your Raspberry Pi 3 DDNS client
In case you need a reference hardware list, you may refer to the following for building your Raspberry Pi 3 DDNS client:
- CanaKit Raspberry Pi 3 with 2.5A Micro USB Power Supply or CanaKit Raspberry Pi 3 B+ (B Plus) with 2.5A Power Supply (UL Listed)
- Raspberry Pi 2/3 official case Black/Grey or Raspberry Pi 2/3 official case Red/White
- Sandisk Ultra 32GB Micro SDHC UHS-I Card with Adapter
- AmazonBasics RJ45 Cat-6 Ethernet Patch Cable - 3 Feet (0.9 Meters)
Setting up Raspbian Stretch Lite with SSH server enabled on your microSD card
Once you had gathered all the necessary hardware, proceed to setup Raspbian Stretch Lite with SSH server enabled on your microSD card. Doing so will allow you to SSH into your Raspbian Stretch Lite to perform further configurations in this post.
Assembling the hardware for the Raspberry Pi 3 reverse proxy server
Once the ssh file is created in the boot partition of the microSD card, remove the microSD card from your SD card reader and insert it to the microSD card slot on the Raspberry Pi 3 board. After that, proceed to assemble the Raspberry Pi 3 board to the Official Raspberry Pi case.
Starting the Raspbian Stretch Lite operating system
With the assembly of your Raspberry Pi 3 board and Official Raspberry Pi case, connect one end of the RJ45 cable to the RJ45 port on the Raspberry Pi 3 board and the other end of the cable to one of the switch port of your home router. After that, connect the micro USB power supply to the Raspberry Pi 3 board and a wall socket. Turn on the power socket to supply power to the Raspberry Pi 3 board.
Changing default password, Locale and Timezone of your Raspbian Stretch Lite
There are a few configurations that you should perform on the first run of your Raspbian Stretch Lite. Proceed on to change the default password, Locale and Timezone of your Raspbian Stretch Lite.
Installing DDclient on your Raspbian Stretch Lite
Once you had changed the default password, Locale and Timezone of your Raspbian Stretch Lite, you can proceed to get a copy of DDclient on your Raspbian Stretch Lite. In order to do so, run the following command:
sudo apt-get install ddclient -y
While the installation is taking place, a wizard will appear to help you configure DDClient to talk to a dynamic DNS provider. Since the configurations for Namecheap is different, you can get through the wizard with some arbitrary value to complete the installation.
Creating the DDclient configurations to set your public IP address to your Namecheap domain
When the installation for DDclient completes, DDclient will run as a service and check for IP changes every 5 minutes. In addition, it will look at /etc/ddclient.conf for instructions on how to update your public IP Address with dynamic DNS providers.
In order to configure DDclient to set your home's public IP address to your Namecheap domain, open up /etc/ddclient.conf with nano:
sudo nano /etc/ddclient.conf
After the nano editor loads the file, change the contents to look like the following:
# Configuration file for ddclient generated by debconf
#
# /etc/ddclient.conf

protocol=namecheap
use=web, web=dynamicdns.park-your-domain.com/getip
server=dynamicdns.park-your-domain.com
# Change the following to your Namecheap domain
login=yourdomain.com
# Change the following to the Dynamic DNS Password that you will find in your Namecheap dashboard
password=a3f5f501589245dAacaf4d20d37Ed7f1
@
When you are done, press Ctrl-X followed by Y to save your changes.
Next, run the following command to get DDclient to pick up the new configurations:
sudo systemctl restart ddclient.service
Given that, Namecheap DNS servers will be notified when your home's public IP address changes. Whenever, a Namecheap DNS server's receives a DNS request for your domain, it will send your home's public IP address back to the requester.
Building a reverse proxy server to host multiple websites from your home
Once you are able to map your domain name to your home's public IP address, you will be able to host multiple websites from your home. In order to do so, you may want to consider building a reverse proxy server with Nginx, Certbot, Raspbian Stretch Lite and Raspberry Pi 3. You can either choose to do that on the Raspberry Pi 3 that runs DDClient, or on another Raspberry Pi 3.
