How to configure Nginx on Raspberry Pi 3 as a reverse proxy server for Synology DiskStation Manager

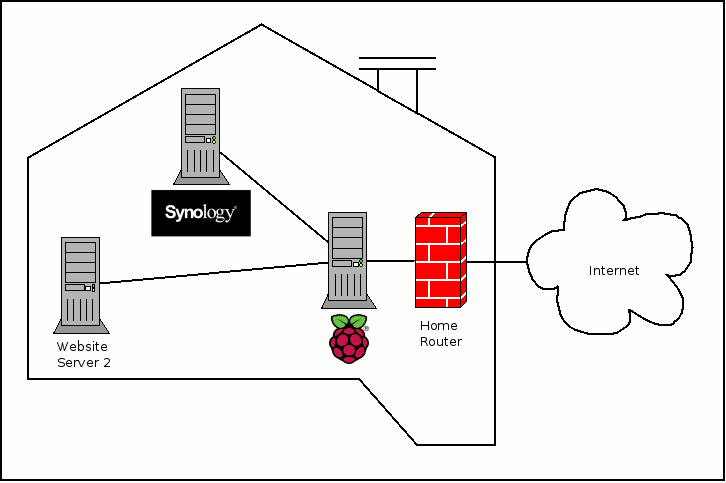
When you get a Synology NAS like DS218j or DS418, you will also get the Synology DiskStation Manager. Eventually, you may want to access websites other than Synology DiskStation Manager from outside your home. In that case, you may want to use Nginx as a reverse proxy server for your websites.
Without a doubt, Raspberry Pi 3 is one single-board computer that packs enough computing power for many use cases. For example, you can setup a Raspberry Pi 3 reverse proxy server with Nginx, Certbot, Raspbian Stretch Lite. Thereafter, you will be able to host multiple websites from home.
In case you have both a Raspberry Pi 3 and a Synology NAS, read on to see how you can configure Nginx on Raspberry Pi 3 as a reverse proxy for Synology DiskStation Manager.
Setting up a reverse proxy server with Nginx, Certbot, Raspbian Stretch Lite and Raspberry Pi 3
In case you had not setup Nginx on Raspberry Pi 3 at home, follow this guide to setup one on Raspberry Pi 3 reverse proxy server. After you had followed the steps till the section on installing Certbot, you will have a Raspberry Pi 3 reverse proxy server with Nginx and Certbot installed.
Setting up a web directory for ACME challenges for validating domain to reach Synology DiskStation Manager
During the validation of domain by Let's Encrypt servers, ACME challenges will need to be created in a web directory and accessed via the domain.
For the purpose of this guide, let's suppose that you
- want to access your Synology DiskStation Manager via nas.yourdomain.com,
- had created the relevant configurations for nas.yourdomain.com to be mapped to the public IP address that your home router had gotten from your ISP. If the public IP address changes frequently, you may want to buy a Namecheap domain and get your Raspberry Pi 3 to use Namecheap dynamic DNS to update your domain when your home’s public IP address changes.
- had configured your router to forward port 80 and port 443 to your Raspberry Pi 3.
In case you need a reference, this is how you can host a web server behind Linksys EA7500 Max-Stream AC1900 router.
Given these points, run the following commands to setup a web directory for Synology DiskStation Manager in your Raspberry Pi 3:
sudo mkdir /www/var/nas.yourdomain.com
sudo chown www-data:www-data /www/var/nas.yourdomain.com
After creating the directory and changing the owner to the www-data user, proceed to create a Nginx configuration at /etc/nginx/sites-enabled/nas.yourdomain.com.conf:
sudo nano /etc/nginx/sites-enabled/nas.yourdomain.com.conf
Once the nano editor loads, write the following content into the editor:
server {
    listen 80;
    server_name  nas.yourdomain.com;

    root /var/www/nas.yourdomain.com;

    location ~ /.well-known {
        allow all;
    }
}
Thereafter, save the file by typing Ctrl-X followed by Y.
After that, run the following command to restart Nginx:
sudo systemctl restart nginx.service
Running Certbot to acquire the Let's Encrypt artefacts that are needed for serving HTTPS traffic for Synology DiskStation Manager
Once you had configured Nginx to facilitate the ACME challenge process, run Certbot to acquire the artefacts that are needed for serving HTTPS traffic for Synology DiskStation Manager:
sudo certbot certonly -a webroot --webroot-path=/var/www/nas.yourdomain.com -d nas.yourdomain.com
After the command completes, you will find Let's Encrypt artefacts inside /etc/letsencrypt/live/nas.yourdomain.com.
Configuring Nginx to serve HTTPS traffic for Synology DiskStation Manager
In case you had not already computed a Diffie-Hellman group for Nginx to use for exchanging cryptographic keys with its clients, run the following command to generate one:
sudo openssl dhparam -out /etc/ssl/certs/dhparam.pem 2048
This process will take some time to complete.
Given that your Synology DiskStation Manager is accessible via 192.168.1.123:5000, let's proceed with configuring Nginx to proxy HTTPS traffic to it. Firstly, open up /etc/nginx/sites-enabled/nas.yourdomain.com.conf with nano:
sudo nano /etc/nginx/sites-enabled/nas.yourdomain.com.conf
After nano editor loads the file, replace the contents with the following:
# Redirect HTTP requests to HTTPS
server {
    listen 80;
    server_name  nas.yourdomain.com;
    return 301 https://$host$request_uri;
}

# For ssl
server {
    client_max_body_size 8M;

    ssl on;
    ssl_certificate /etc/letsencrypt/live/nas.yourdomain.com/fullchain.pem;
    ssl_certificate_key /etc/letsencrypt/live/nas.yourdomain.com/privkey.pem;
    ssl_protocols TLSv1 TLSv1.1 TLSv1.2;
    ssl_prefer_server_ciphers on;
    ssl_dhparam /etc/ssl/certs/dhparam.pem;
    ssl_ciphers 'ECDHE-RSA-AES128-GCM-SHA256:ECDHE-ECDSA-AES128-GCM-SHA256:ECDHE-RSA-AES256-GCM-SHA384:ECDHE-ECDSA-AES256-GCM-SHA384:DHE-RSA-AES128-GCM-SHA256:DHE-DSS-AES128-GCM-SHA256:kEDH+AESGCM:ECDHE-RSA-AES128-SHA256:ECDHE-ECDSA-AES128-SHA256:ECDHE-RSA-AES128-SHA:ECDHE-ECDSA-AES128-SHA:ECDHE-RSA-AES256-SHA384:ECDHE-ECDSA-AES256-SHA384:ECDHE-RSA-AES256-SHA:ECDHE-ECDSA-AES256-SHA:DHE-RSA-AES128-SHA256:DHE-RSA-AES128-SHA:DHE-DSS-AES128-SHA256:DHE-RSA-AES256-SHA256:DHE-DSS-AES256-SHA:DHE-RSA-AES256-SHA:AES128-GCM-SHA256:AES256-GCM-SHA384:AES128-SHA256:AES256-SHA256:AES128-SHA:AES256-SHA:AES:CAMELLIA:DES-CBC3-SHA:!aNULL:!eNULL:!EXPORT:!DES:!RC4:!MD5:!PSK:!aECDH:!EDH-DSS-DES-CBC3-SHA:!EDH-RSA-DES-CBC3-SHA:!KRB5-DES-CBC3-SHA';
    ssl_session_timeout 1d;
    ssl_session_cache shared:SSL:50m;
    ssl_stapling on;
    ssl_stapling_verify on;
    add_header Strict-Transport-Security max-age=15768000;

    default_type  application/octet-stream;

    listen 443;
    server_name  nas.yourdomain.com;

    root /var/www/nas.yourdomain.com;

    location ~ /.well-known {
        allow all;
    }

    location / {
        proxy_pass http://192.168.1.123:5000;
    }
}
Thereafter, save the file by typing Ctrl-X followed by Y.
After that, run the following command to restart Nginx:
sudo systemctl restart nginx.service
When your Nginx had restarted successfully, you will be able to access your Synology DiskStation Manager at nas.yourdomain.com via HTTPS.
Renewing the Let's Encrypt SSL certificate for nas.yourdomain.com in the future
Eventually, your Let's Encrypt SSL certificate will expire. In that case, you can renew your SSL certificate for nas.yourdomain.com with the following command:
sudo certbot certonly --force-renewal -a webroot --webroot-path=/var/www/nas.yourdomain.com -d nas.yourdomain.com
Solving: Failed to upload "". Connection failed. Please check your network settings.
When you encounter the message:
Failed to upload "
". Connection failed. Please check your network settings.
while uploading your file, it could be that the file had exceeded 8MB. In this case, update the client_max_body_size directive to take a larger value. After you had changed the value in /etc/nginx/sites-enabled/nas.yourdomain.com.conf, restart Nginx with the following command:
sudo systemctl restart nginx.service