How I built my Raspberry Pi 3 CCTV using a motionEyeOS image for home surveillance
When I bought my Raspberry Pi 2, I also bought the first version of the Raspberry Camera Module just for the fun of it. After setting up my Raspberry Pi 2 as a TV box for my wife, that camera module became an ornament. Feeling bad about such wastage, I bought another Raspberry Pi 3 to utilise the camera module in performing home surveillance.
This post documents the steps that I took to build my Raspberry Pi 3 CCTV via a MotionEyeOS image for home surveillance.
Getting the hardware for my Raspberry Pi 3 CCTV
I used the following hardware to realise my Raspberry Pi 3 CCTV:
- A Raspberry Pi 3 motherboard
- A Raspberry Pi Camera Module
- A Raspberry Pi Model B+ Case Enclosure (Clear)
- A SanDisk Ultra 64 GB microSDXC Micro SD
Getting the MotionEyeOS image for my Raspberry Pi 3
After I got the hardware, I went on to download the MotionEyeOS image for my Raspberry Pi 3. Calin Crisan had created a page for us to download different releases of MotionEyeOS for different Single Board Computers. I chose motioneyeos-raspberrypi3-20160410.img.gz and saved it onto the file system of my Windows machine.
I then used 7-zip to extract the .img file from motioneyeos-raspberrypi3-20160410.img.gz. Once the .img file was extracted, I used Win32 Disk Imager to write the .img file into the SanDisk microSD card via the SD card drive on my laptop
Booting into my MotionEyeOS on my Raspberry Pi 3 CCTV
After my Win32 Disk Imager completed writing the MotionEyeOS onto my microSD card, I inserted the microSD card into the microSD card slot on my Raspberry Pi 3 board.
I then proceeded to connect my Raspberry Pi Camera module to the Raspberry Pi 3 board and put them inside the case enclosure.
To have a glimpse of what will happen the first time my Raspberry Pi 3 CCTV boots up, I connected my Samsung monitor and my Logitech keyboard to it.
I also connected my Raspberry Pi 3 with my network cable so that I could configure it via a web browser.
Lastly, I connected my Raspberry Pi 3 CCTV to my Belkin micro USB cable which was in turned connected to my USB wall plug charger.
Key activities that MotionEyeOS did when it boots up for the first time
When my MotionEyeOS image booted up for the first time, it performed the following:
- Expanded the data partition to take the entire microSD card space
- Configured a default hostname
- Created a default password for the root user, which was empty
- Configured the network settings of the ethernet port of my Raspberry Pi 3 to request an IP address via DHCP
Among the initial configurations, my MotionEyeOS also started syslogd, the watchdog, brownout detector, eudev, http date updater, crond, sshd, proftpd. smbd, nmbd and motioneye.
The IP address that was allocated to my MotionEyeOS was also shown before the login prompt.
Accessing my camera video stream with my browser from within my home network
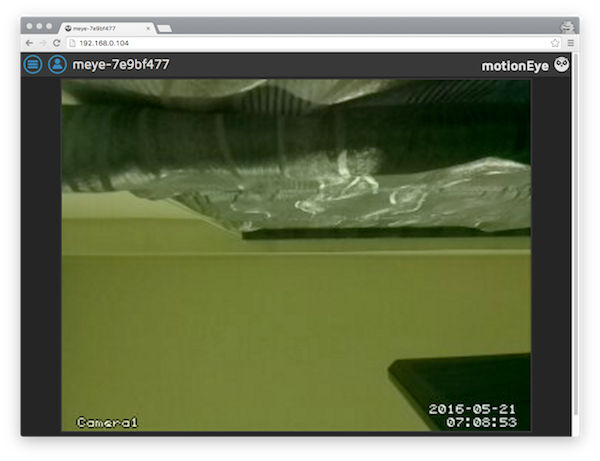
After my Raspberry Pi 3 CCTV had booted up successfully, I opened a browser from a computer that is connected to my home network and entered the IP address of the Raspberry Pi 3 CCTV in the location bar. With that, I was shown a window that showed a video stream from the camera on my Raspberry Pi 3 CCTV:
Ensuring that my Raspberry Pi 3 CCTV can only be accessed through my user account
It felt insecure to have my Raspberry Pi 3 CCTV showing the video stream from its camera without any login prompt. As such, I proceeded to set some passwords to guard accesses to my Raspberry Pi 3.
To apply access control to my Rasberry Pi 3 CCTV, I would need to login as the admin user.
To login as the admin user, I clicked on the second button at the top left corner. I was then shown the login screen:
At the login prompt, I entered admin as the username, left the password field blank and clicked on Login.
After that, the browser would show the video stream from my camera again.
I then clicked on the first button on the top left corner to get the following screen:

Setting a password for the admin user
In MotionEyeOS, the admin user is given the rights to configure MotionEyeOS.
The username of the admin user cannot be changed.
To set a password for the admin user, I entered a password in the Admin Username text field.
Creating the surveillance user
The surveillance user is only granted view access to the video stream from my Raspberry Pi 3 camera. Configuring a username and password for the surveillance user would ensure that the video stream from my Raspberry Pi 3 CCTV camera only displays after either the surveillance user or admin user logs in successfully.
To create a surveillance user, I entered a username in the Surveillance Username text field and a password in the Surveillance Password text field.
Applying password changes made to the admin user and the surveillance user
After I had keyed in the details for the admin and Surveillance users, I clicked on the Apply button on the top to persist the changes. With that, the following prompt appeared to get me to reboot my Raspberry Pi 3 CCTV:
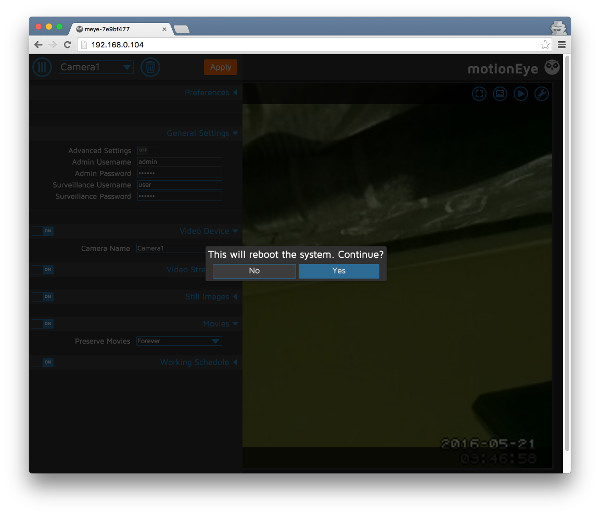
I clicked Yes to make MotionEyeOS reboot itself.
After my Raspberry Pi 3 CCTV started up again, I was shown the login prompt.
I keyed in my admin user credentials to continue on with the rest of the configurations.
Changing the default timezone
Since I do not reside in a region that is part of the UTC timezone, the timestamp reflected on my video stream was incorrect. An inaccurate time display would create inconvenience when I wanted to verify whether the deliveryman from the postal service had really attempted to come to my house at the time that they claimed in their failed delivery sms message.
To change the default timezone to the one that my region followed, I clicked on the first button on the top left corner to open up the settings drawer. Inside the settings drawer, I located the General Settings section and clicked on the toggle button next to Advanced Settings. After doing so, I was able to change the Time Zone on my Raspberry Pi 3 CCTV:

To configure the Time Zone on my Raspberry Pi CCTV, I selected Asia/Singapore from the Time Zone dropbox and clicked the Apply button at the top of the screen to commit the changes. I clicked Yes when MotionEyeOS asked to reboot itself.
After my Raspberry Pi 3 CCTV started up again, I keyed in my admin user credentials to continue on with the other configurations.
Configuring wireless connection to my home network
Since Raspberry Pi 3 comes with wifi capability, configuring my CCTV to connect to my home network connection wirelessly would eliminate the need for another cable for network communications.
To configure wireless access, I first clicked on the first button at the top left corner to bring out the configurations drawer.
After that, I clicked on the Network tab to expand the network settings section:
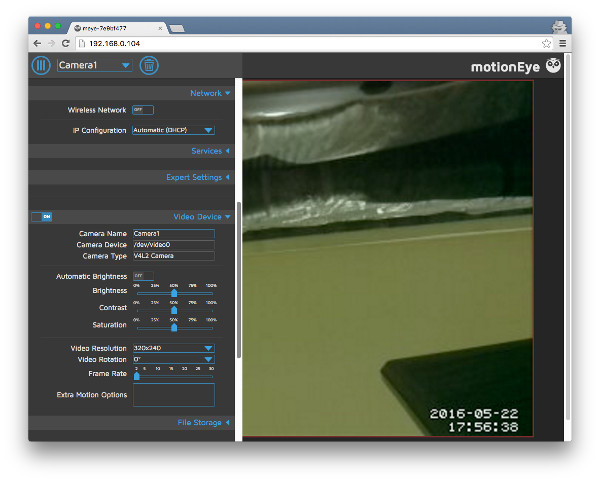
I then clicked on the toggle button for Wireless Network to turn on wireless network connections. This would make the Wireless Network Name and Wireless Network Key text fields appear for me to key in my home wireless network details.
Once I was done with my Wireless Network configurations, I clicked the Apply button and rebooted my Raspberry Pi 3 CCTV.
When my Raspberry Pi 3 CCTV started up, I keyed in my admin user credentials to continue on with the other configurations.
To get the IP address that my Raspberry Pi 3 had gotten for its wifi interface, I connected my monitor to it and looked for the status output that looked like the following:
Interface wlan0 has IP address 192.168.0.107/24
In this case, I would enter 192.168.0.107 in the location bar of my browser from a computer that is connected to my home network so as to connect to my Raspberry Pi 3 CCTV via its wifi interface.
Turning off the camera LED indicator
Seeing the video stream would be sufficient for me to determine that the camera is working. As such, I went on to turn off the camera LED indicator so that I can reduce the power consumption of my Raspberry Pi 3 CCTV.
To do so, I first clicked on the first button on the top left of the screen to bring out the configurations drawer.
I then looked for the Expert Settings tab and clicked on it to expand the expert settings section:
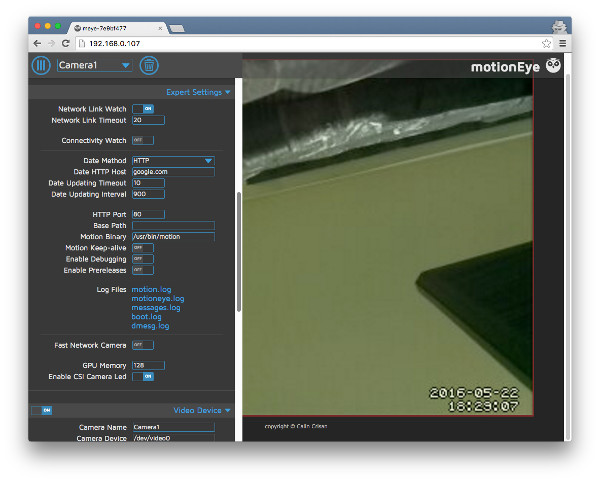
To turn off the LED indicator of the camera, I clicked on the toggle button for Enable CSI Camera Led to switch it off.
I then click on the Apply button at the top and rebooted my Raspberry Pi 3 CCTV.
After my Raspberry Pi 3 CCTV booted up again, I keyed in the admin user credentials to continue with the other configurations.
Limiting the preservation of still images and movies
By default, MotionEyeOS keeps pictures and movies for as long as it can. However, I figured out that I would only require the still images and movies be kept for one month.
As such, I went on to configure my Raspberry Pi 3 CCTV to keep pictures and movies for a maximum of 1 month.
To configure the preservation period of pictures and movies, I first clicked on the first button on the top left of the screen to bring out the configurations drawer.
I then clicked on the Still Images and Movies tabs to expand both configuration sections:

I then chose the For One Month option for Preserve Pictures and Preserve Movies and clicked Ok on the prompts that appeared.
Once I was done with that, I clicked on the Apply button at the top to persist the configurations and rebooted my Raspberry Pi 3 CCTV.
With that, I was satisfied with the configurations that I wanted for my Raspberry Pi 3 CCTV.
Making my Raspberry Pi 3 CCTV camera accessible from outside my home network through HTTPS
Without HTTPS, it would be insecure to access my Raspberry Pi 3 CCTV camera from outside my home network. Protecting the HTTP traffic between a web browser and my Raspberry Pi 3 CCTV camera would require a reverse proxy server, a domain name and a SSL certificate.
Through my experience in setting up a LEMP web server on Raspberry Pi 3 and setting up a free CA signed SSL certificate to secure a WordPress site hosted on it, I had the hardware and software resources to secure access to my Raspberry Pi 3 CCTV camera with HTTPS.
Creating a sub domain from a domain that I already owned and point that sub domain to the public IP address of my home router
Since I own a couple of domain names, I could create a sub domain from one of the domain names. And since I am leveraging on DigitalOcean name servers to translate my domain names into IP addresses, I could create a sub domain via DigitalOcean's control panel.
To create a sub domain via DigitalOcean's control panel, I logged into my Digital Ocean account and go to the "Networking" page. I then proceeded to the "Domain" tab to select a domain which I wanted to create a sub domain from.
At the "Create new record" page, I entered the sub domain that I wanted for my Raspberry Pi 3 CCTV camera and the public IP address of my home router:
After clicking on the "Create Record" button, I was able to get the IP address of my home router by sending a ping to cctv.adomainname.com.
And being able to reach my home router will meant that I was able to reach the LEMP server running on my Raspberry Pi 3.
Configuring nginx to facilitate the Let's Encrypt client in acquiring the SSL certificate for my sub domain
Once I was sure that the nginx server running on my Raspberry Pi 3 could receive HTTP requests directed at my sub domain, I proceeded on with creating the nginx configurations to facilitate the Let's Encrypt client in acquiring the SSL certificate for my sub domain.
To do so, I connected to my Raspberry Pi 3 LEMP server via SSH:
ssh root@192.168.0.123
Once I got into my Raspberry Pi 3 LEMP server, I used nano to create a configuration file at /etc/nginx/sites-enabled/cctv.adomainname.com.conf:
sudo nano /etc/nginx/sites-enabled/cctv.adomainname.com.conf
Once inside my nano editor, I created the following nginx configuration:
server {
	listen 80;
	server_name  cctv.adomainname.com;

	root /var/www/cctv.adomainname.com;

	location ~ /.well-known {
		allow all;
	}
}
After creating the nginx configurations, I saved the file and restarted my nginx server:
sudo systemctl restart nginx.service
I also created the directory /www/var/cctv.adomainname.com for the Let's Encrypt client to use in the process of acquiring the SSL certificate for my sub domain:
sudo mkdir /www/var/cctv.adomainname.com
sudo chown www-data:www-data /www/var/cctv.adomainname.com
Running Let's Encrypt client to get a SSL certificate artefacts for the sub domain to my Raspberry Pi 3 CCTV camera
Once I had the configurations necessary for the Let's Encrypt client to acquire the SSL certificate artefacts for my sub domain, I ran the following command to get the Let's Encrypt client running:
/opt/letsencrypt/letsencrypt-auto certonly -a webroot --webroot-path=/var/www/cctv.adomainname.com -d cctv.adomainname.com
Generating a strong Diffie-Hellman group
After the SSL certificate and the corresponding private key were created successfully, I went on to precompute a strong Diffie-Hellman group for my server to use for exchanging cryptographic keys with its clients:
sudo openssl dhparam -out /etc/ssl/certs/dhparam.pem 2048
This process took a very long time to complete but it was worth the effort as it would make communicating with my server more secure.
Creating the nginx configurations for serving HTTPS on behalf of my Raspberry Pi 3 CCTV camera
Once I had the corresponding SSL certificate artefacts for my sub domain, my nginx was ready for the corresponding configurations to serve HTTPS on behalf of my Raspberry Pi 3 CCTV camera. The following is the last set of configurations that I included in /etc/nginx/sites-enabled/cctv.adomainname.com.conf. These set of configurations allows me to access my Raspberry Pi 3 CCTV camera over HTTPS via my sub domain:
# Redirect HTTP requests to HTTPS
server {
	listen 80;
	server_name  cctv.adomainname.com;
	return 301 https://$host$request_uri;
}

# For ssl
server {
	ssl on;
	ssl_certificate /etc/letsencrypt/live/cctv.adomainname.com/fullchain.pem;
	ssl_certificate_key /etc/letsencrypt/live/cctv.adomainname.com/privkey.pem;
	ssl_protocols TLSv1 TLSv1.1 TLSv1.2;
	ssl_prefer_server_ciphers on;
	ssl_dhparam /etc/ssl/certs/dhparam.pem;
	ssl_ciphers 'ECDHE-RSA-AES128-GCM-SHA256:ECDHE-ECDSA-AES128-GCM-SHA256:ECDHE-RSA-AES256-GCM-SHA384:ECDHE-ECDSA-AES256-GCM-SHA384:DHE-RSA-AES128-GCM-SHA256:DHE-DSS-AES128-GCM-SHA256:kEDH+AESGCM:ECDHE-RSA-AES128-SHA256:ECDHE-ECDSA-AES128-SHA256:ECDHE-RSA-AES128-SHA:ECDHE-ECDSA-AES128-SHA:ECDHE-RSA-AES256-SHA384:ECDHE-ECDSA-AES256-SHA384:ECDHE-RSA-AES256-SHA:ECDHE-ECDSA-AES256-SHA:DHE-RSA-AES128-SHA256:DHE-RSA-AES128-SHA:DHE-DSS-AES128-SHA256:DHE-RSA-AES256-SHA256:DHE-DSS-AES256-SHA:DHE-RSA-AES256-SHA:AES128-GCM-SHA256:AES256-GCM-SHA384:AES128-SHA256:AES256-SHA256:AES128-SHA:AES256-SHA:AES:CAMELLIA:DES-CBC3-SHA:!aNULL:!eNULL:!EXPORT:!DES:!RC4:!MD5:!PSK:!aECDH:!EDH-DSS-DES-CBC3-SHA:!EDH-RSA-DES-CBC3-SHA:!KRB5-DES-CBC3-SHA';
	ssl_session_timeout 1d;
	ssl_session_cache shared:SSL:50m;
	ssl_stapling on;
	ssl_stapling_verify on;
	add_header Strict-Transport-Security max-age=15768000;

	default_type  application/octet-stream;

	listen 443;
	server_name  cctv.adomainname.com;

	root /var/www/cctv.adomainname.com;

	location ~ /.well-known {
		allow all;
	}

	location / {
		proxy_pass http://192.168.0.107;
	}
}
Buying your Raspberry Pi 3 CCTV camera from Amazon
If you do not have the Raspberry Pi 3 components mentioned in this post yet, you may want to purchase them from Amazon. Simply click on the button below to add the Raspberry Pi 3 components to your cart. You may remove anything that you already have or replace some of the components with other components.