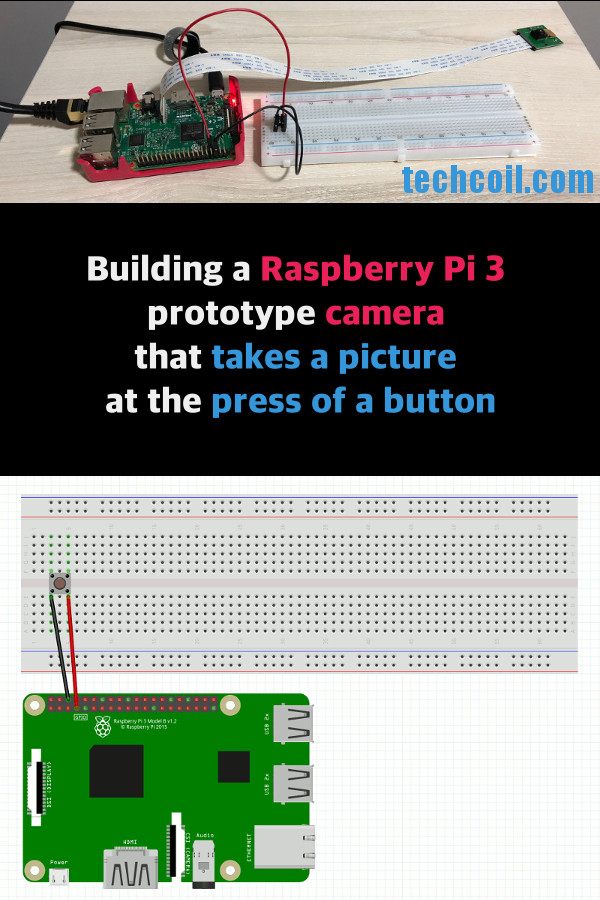
Building a Raspberry Pi 3 prototype camera that takes a picture at the press of a button
A fun way to test your Raspberry Pi Camera on your Raspberry Pi 3 is to build a prototype that takes a picture at the press of a button. Through such an activity, we will be able to experience:
- connecting a button to the GPIO ports on a Raspberry Pi.
- setting up a camera through the CSI interface of a Raspberry Pi.
- preparing an operating system, such as Raspbian Stretch Lite , for running Raspberry Pi projects.
- coding a Python 3 script that interacts with the GPIO port and camera on a Raspberry Pi.
- running a Python 3 script when Raspberry Pi powers on.
Given these points, this post shows how you can build a Raspberry Pi 3 prototype camera that takes a picture at the press of a button.
Suggested bill of materials for this Raspberry Pi 3 project
In case you need some reference on what you can buy for this Raspberry Pi 3 project, the following is a suggested bill of materials for you:
- CanaKit Raspberry Pi 3 B+ (B Plus) with 2.5A Power Supply (UL Listed)
- Sandisk Ultra 32GB Micro SDHC UHS-I Card with Adapter
- Raspberry Pi Camera Module V2 - 8 Megapixel,1080p
- A push button, two male-to-female jumper wires and a breadboard from an electronic kit like REXQualis Electronics Component Fun Kit
- Official Raspberry Pi 3 Case - Red/White (Optional)
Connecting the push button to the GPIO ports on your Raspberry Pi 3 via the breadboard
For the purpose of this guide, let's use GPIO 4 and one of the ground pins of your Raspberry Pi 3 to detect button presses. The following diagram shows how you can wire the push button to a Raspberry Pi 3 via a breadboard:
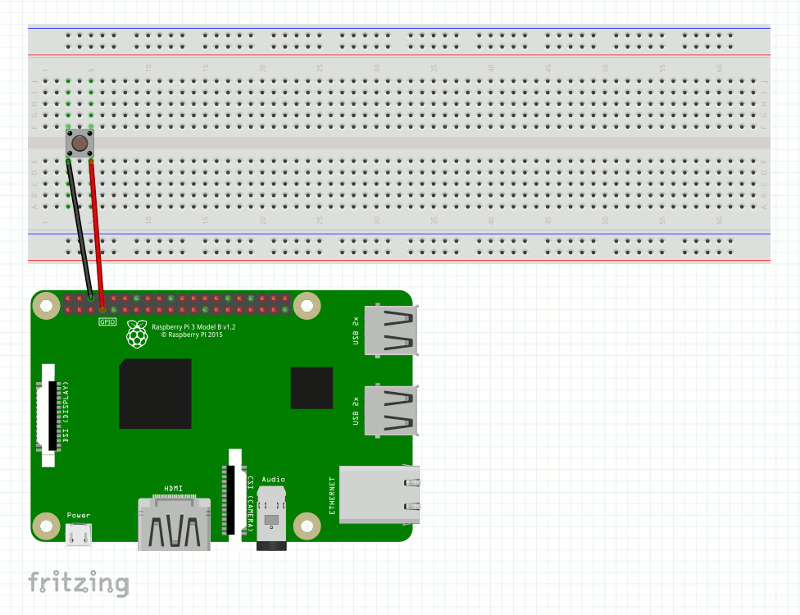
If you want to connect your push button to other GPIO pins on your Raspberry Pi 3, you can checkout these GPIO Pinout resources to help you do so.
How should the button be inserted onto the breadboard
The following diagram shows a push button that is partially inserted:
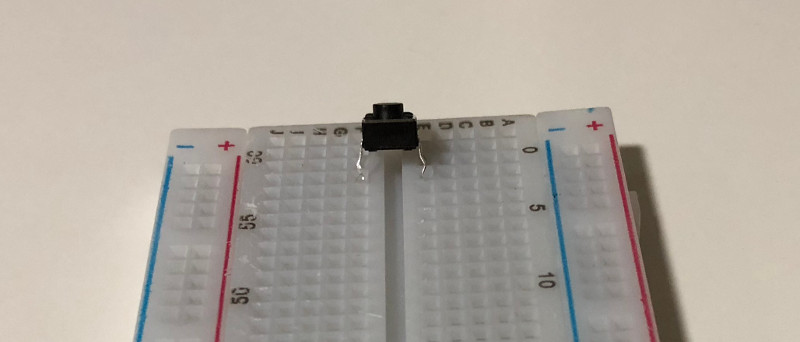
This is how the legs of the push button be positioned when you insert it onto the breadboard.
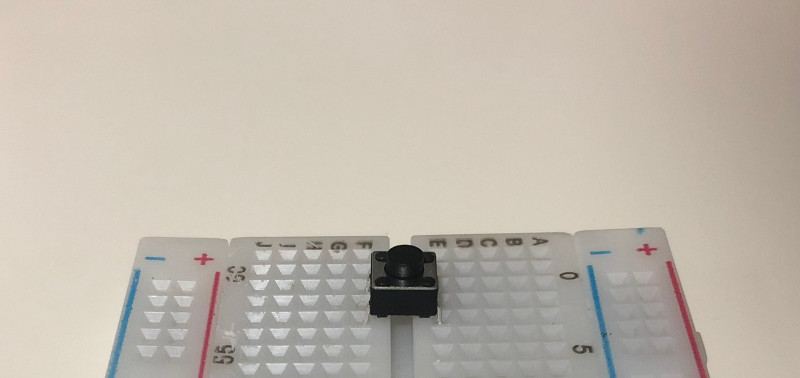
Fully insert the push button into the breadboard before continuing with the tutorial:
Connecting the Raspberry Pi Camera Module to your Raspberry Pi 3
After you had connected your push button to your Raspberry Pi 3, proceed to connect the Raspberry Pi Camera Module to your Raspberry Pi 3.
After connecting the Raspberry Pi Camera Module to your Raspberry Pi 3, your setup should look like this:
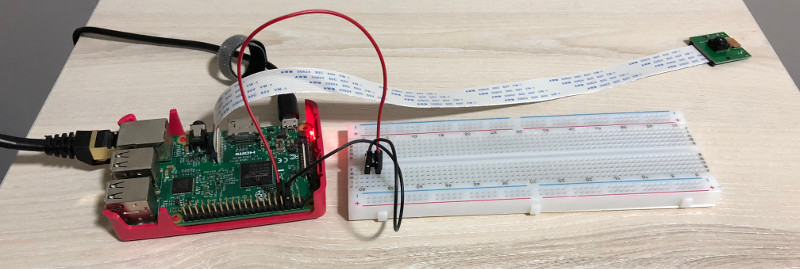
Setting up Raspbian Stretch Lite with SSH server enabled on your microSD card
Once you had connected the camera and button to your Raspberry Pi 3, proceed to setup Raspbian Stretch Lite with SSH server enabled on your microSD card. Doing so will allow you to SSH into your Raspbian Stretch Lite to perform further configurations in this post.
Starting the Raspbian Stretch Lite operating system
Next, connect one end of the RJ45 cable to the RJ45 port on the Raspberry Pi 3 board and the other end of the cable to one of the switch port of your home router. After that, connect the micro USB power supply to the Raspberry Pi 3 board and a wall socket. Turn on the power socket to supply power to the Raspberry Pi 3 board.
Getting into Raspbian Stretch Lite and updating it
After you had started your Raspbian Stretch Lite, SSH into your Raspberry Pi 3 with a computer that is connected to the same network as your Raspberry Pi 3.
Suppose your router had given your Raspberry Pi 3 192.168.1.123 as the IP address, you will run the following command from your terminal program to get into Raspbian Stretch Lite:
ssh pi@192.168.1.123
When Raspbian Stretch Lite prompts for a password, enter raspberry.
Once you had gotten into Raspbian Stretch Lite, run the following command to update it:
sudo apt-get update
Enabling the camera on Raspbian Stretch Lite
Before we can use the camera on Raspbian Stretch Lite, we need to enable it. Therefore, follow this guide to enable Raspberry Pi Camera on Raspbian Stretch Lite.
Installing Virtualenv on Raspbian Stretch Lite
Virtualenv is a tool that allows us to create isolated environments in the same machine. This is useful when you have to run multiple applications with conflicting python dependencies on your Raspberry Pi 3.
Therefore to be able to use the same Raspberry Pi 3 to try out other projects, we will be using Virtualenv to create an environment to run our Python 3 script.
To install Virtualenv, run the following command:
sudo apt-get install virtualenv -y
Installing Supervisor
When we want our Python 3 script to start at boot time and constantly listen for button presses, we can use Supervisor to help us monitor and control the process that will run our Python 3 script.
In order to install Supervisor, we need to run the following command:
sudo apt-get install supervisor -y
Coding a Python 3 script that interacts with the GPIO ports on a Raspberry Pi
After installing Supervisor, we can proceed to code a simple Python 3 script that will:
- Listen for button presses.
- Take a picture with the camera when the button is pressed.
Given these points, let's use nano to create a Python script at /home/pi/run.py:
nano /home/pi/run.py
Once the editor starts, copy the following Python 3 codes into the editor:
from gpiozero import Button
from picamera import PiCamera
from signal import pause

import time

camera = PiCamera()

def take_picture_with_camera():

    image_path = '/home/pi/images/image_%s.jpg' % int(round(time.time() * 1000))
    camera.capture(image_path)
    print('Took photo')

button = Button(4)
button.when_pressed = take_picture_with_camera

pause()
After that, type Ctrl-X and then Y to save the file.
In the Python 3 script, we first import the libraries that we are going to use. After that, we create an instance of PiCamera for interfacing with the Raspberry Pi Camera module.
Python 3 codes to take picture with Raspberry Pi Camera
Once we had created an instance of PiCamera, we define a function: take_picture_with_camera.
Inside take_picture_with_camera, we use
time.time()to define an image path to save the picture that the camera will capture later,camera.capture(image_path)to take a picture with the camera and save the image to the path defined by image_path,
Python 3 codes to listen for button presses
After defining the function, we went ahead to create an instance of Button that will listen to voltage changes on GPIO 4.
Once we had created an instance of the button, we assign take_picture_with_camera to button.when_pressed. As a result of this, take_picture_with_camera will be called when the push button is pressed.
Finally, we pause the Python 3 script to stop it from terminating.
Creating a virtual environment to run the Python 3 script
Next, let's create a virtual environment to run the Python 3 script. In order to do so, we will run the following command:
virtualenv -p python3 /home/pi/rpi-cam-prototype-env
After that, we get into the virtual environment by running the following command:
source /home/pi/rpi-cam-prototype-env/bin/activate
Once you gotten into the virtual environment, run the following commands to install the Python dependencies for the Python 3 script:
pip install gpiozero==1.4.1 picamera==1.13 RPi.GPIO==0.6.3
When pip finishes the installations, you will be able to run your Python 3 script within the virtual environment.
Testing your Python 3 script
After you had prepared the virtual environment for your Python 3 script, create the /home/pi/images folder:
mkdir /home/pi/images
When the folder is created, run your Python script with the following commands:
cd /home/pi
python run.py
You will notice that after you ran the commands, the terminal pauses. In addition, the LED on the Raspberry Pi Camera lights up. This indicates that your Python 3 script is ready to listen for button presses.
Given that, whenever you press the push button, you will find an image being created inside the /home/pi/images folder.
Running the Python 3 script when your Raspberry Pi 3 powers on
When you want your Python 3 script to run whenever your Raspberry Pi 3 is turned on, you can depend on Supervisor. This section will show how you can to get Supervisor to run your Python 3 script whenever your Raspberry Pi 3 is turned on.
Firstly, let's create a shell script that will activate the virtual environment that we had created earlier and run our Python 3 script within that virtual environment.
To do so, we use nano to create a shell script at /home/pi/run.sh
nano /home/pi/run.sh
Once the editor loads, write the following content into the editor:
!#/bin/bash
source ./rpi-cam-prototype-env/bin/activate
python run.py
deactivate
After you had included the content, type Ctrl-X and then Y to save the file.
Afterwards, make the shell script executable by running the following command:
sudo chmod 744 /home/pi/run.sh
To get Supervisor to start our Python 3 script so that we can take pictures with our Raspberry Pi 3 prototype, we first create a configuration file at /etc/supervisor/conf.d/rpi3-camera-prototype.conf:
sudo nano /etc/supervisor/conf.d/rpi3-camera-prototype.conf
After nano loads, copy the following configuration codes into the editor:
[program:rpi3-camera-prototype]
directory=/home/pi
command=/bin/bash -E -c ./run.sh
autostart=true
autorestart=true
stopsignal=INT
stopasgroup=true
killasgroup=true
user=pi
Once you had written the configurations into the editor, run the following command to restart Supervisor:
sudo systemctl restart supervisor.service
When Supervisor runs again, it will take the configurations that you had created earlier and run your Python 3 script.
With that, whenever you power on your Raspberry Pi 3, you will be able to take pictures with your Raspberry Pi camera by pushing the button.
Further enhancement: Perform image compression on the pictures from your Python 3 script
You may have noticed that the images that you Raspberry Pi camera took are pretty big, each of them takes more than 150 KB.
In case you are extending the prototype to send the pictures to a server endpoint, you may want to compress the pictures before sending it, especially when you connect your Raspbian Stretch Lite to your iPhone Personal WiFi hotspot.
In such a situation, you may want to use Python 3 Pillow on Raspbian Stretch Lite to compress your jpeg images.
To keep this tutorial short, I will leave it to you to figure out how to modify the Python 3 script to compress your pictures with Pillow.
